<?xml version="1.0" encoding="utf-8"?><feed xmlns="http://www.w3.org/2005/Atom" ><generator uri="https://jekyllrb.com/" version="4.3.1">Jekyll</generator><link href="https://moncho.cloud/feed.xml" rel="self" type="application/atom+xml" /><link href="https://moncho.cloud/" rel="alternate" type="text/html" /><updated>2026-06-08T14:38:10-05:00</updated><id>https://moncho.cloud/feed.xml</id><title type="html">moncho.cloud</title><subtitle>Moncho Pena - Engineering Leader | Distributed Systems, Fintech &amp; Scalable Platforms.  Writing about Kubernetes, Node.js, DevOps, fintech, and open-source technologies.</subtitle><author><name>Moncho Pena</name></author><entry><title type="html">Testing Kind Kubernetes cluster in your virtual machine</title><link href="https://moncho.cloud/kubernetes/kind/testing/virtual/machine/2023/11/09/kind-kubernetes-virtual-machine.html" rel="alternate" type="text/html" title="Testing Kind Kubernetes cluster in your virtual machine" /><published>2023-11-09T16:00:00-06:00</published><updated>2023-11-09T16:00:00-06:00</updated><id>https://moncho.cloud/kubernetes/kind/testing/virtual/machine/2023/11/09/kind-kubernetes-virtual-machine</id><content type="html" xml:base="https://moncho.cloud/kubernetes/kind/testing/virtual/machine/2023/11/09/kind-kubernetes-virtual-machine.html"><![CDATA[<p>I created a VPS with 16GB of RAM and 6 CPU to test my applications in a Kubernetes cluster.</p>

<p>First you need to install <a href="https://www.docker.com/">Docker</a> and <a href="https://kind.sigs.k8s.io/">Kind</a>.</p>

<p>For docker you can use this useful script:</p>

<div class="language-bash highlighter-rouge"><div class="highlight"><pre class="highlight"><code><span class="c"># Add Docker's official GPG key:</span>
<span class="nb">sudo </span>apt-get update
<span class="nb">sudo </span>apt-get <span class="nb">install </span>ca-certificates curl gnupg
<span class="nb">sudo install</span> <span class="nt">-m</span> 0755 <span class="nt">-d</span> /etc/apt/keyrings
curl <span class="nt">-fsSL</span> https://download.docker.com/linux/debian/gpg | <span class="nb">sudo </span>gpg <span class="nt">--dearmor</span> <span class="nt">-o</span> /etc/apt/keyrings/docker.gpg
<span class="nb">sudo chmod </span>a+r /etc/apt/keyrings/docker.gpg

<span class="c"># Add the repository to Apt sources:</span>
<span class="nb">echo</span> <span class="se">\</span>
  <span class="s2">"deb [arch="</span><span class="si">$(</span>dpkg <span class="nt">--print-architecture</span><span class="si">)</span><span class="s2">" signed-by=/etc/apt/keyrings/docker.gpg] https://download.docker.com/linux/debian </span><span class="se">\</span><span class="s2">
  "</span><span class="si">$(</span><span class="nb">.</span> /etc/os-release <span class="o">&amp;&amp;</span> <span class="nb">echo</span> <span class="s2">"</span><span class="nv">$VERSION_CODENAME</span><span class="s2">"</span><span class="si">)</span><span class="s2">" stable"</span> | <span class="se">\</span>
  <span class="nb">sudo tee</span> /etc/apt/sources.list.d/docker.list <span class="o">&gt;</span> /dev/null
<span class="nb">sudo </span>apt-get update
<span class="nb">sudo </span>apt-get <span class="nb">install </span>docker-ce docker-ce-cli containerd.io docker-buildx-plugin docker-compose-plugin
</code></pre></div></div>
<p>Add your user to docker group:</p>

<div class="language-bash highlighter-rouge"><div class="highlight"><pre class="highlight"><code><span class="nb">sudo </span>usermod <span class="nt">-aG</span> docker <span class="nv">$USER</span>
</code></pre></div></div>

<p>Now create a file with Kind configuration:</p>

<div class="language-yaml highlighter-rouge"><div class="highlight"><pre class="highlight"><code><span class="na">kind</span><span class="pi">:</span> <span class="s">Cluster</span>
<span class="na">apiVersion</span><span class="pi">:</span> <span class="s">kind.x-k8s.io/v1alpha4</span>
<span class="na">nodes</span><span class="pi">:</span>
<span class="pi">-</span> <span class="na">role</span><span class="pi">:</span> <span class="s">control-plane</span>
  <span class="na">extraPortMappings</span><span class="pi">:</span>
  <span class="pi">-</span> <span class="na">containerPort</span><span class="pi">:</span> <span class="m">30167</span>
    <span class="na">hostPort</span><span class="pi">:</span> <span class="m">80</span>
  <span class="pi">-</span> <span class="na">containerPort</span><span class="pi">:</span> <span class="m">30794</span>
    <span class="na">hostPort</span><span class="pi">:</span> <span class="m">443</span>
  <span class="na">kubeadmConfigPatches</span><span class="pi">:</span>
  <span class="pi">-</span> <span class="pi">|</span>
    <span class="s">kind: InitConfiguration</span>
    <span class="s">nodeRegistration:</span>
      <span class="s">kubeletExtraArgs:</span>
        <span class="s">node-labels: "ingress-ready=true"</span>
<span class="na">name</span><span class="pi">:</span> <span class="s">kindly</span>
<span class="na">networking</span><span class="pi">:</span>
  <span class="na">ipFamily</span><span class="pi">:</span> <span class="s">ipv4</span>
  <span class="na">apiServerAddress</span><span class="pi">:</span> <span class="s">192.168.1.88</span>
</code></pre></div></div>

<p>Install Kind</p>

<div class="language-bash highlighter-rouge"><div class="highlight"><pre class="highlight"><code>curl <span class="nt">-Lo</span> ./kind https://kind.sigs.k8s.io/dl/v0.20.0/kind-linux-amd64
<span class="nb">chmod</span> +x ./kind
<span class="nb">sudo mv</span> ./kind /usr/local/bin/kind
</code></pre></div></div>

<p>And create the cluster:</p>

<div class="language-bash highlighter-rouge"><div class="highlight"><pre class="highlight"><code>kind create cluster <span class="nt">--config</span> kind.yaml
</code></pre></div></div>

<p>Install Kubectl:</p>

<div class="language-bash highlighter-rouge"><div class="highlight"><pre class="highlight"><code><span class="nb">sudo </span>apt-get update <span class="o">&amp;&amp;</span> <span class="nb">sudo </span>apt-get <span class="nb">install</span> <span class="nt">-y</span> apt-transport-https gnupg2
curl <span class="nt">-s</span> https://packages.cloud.google.com/apt/doc/apt-key.gpg | <span class="nb">sudo </span>apt-key add -
<span class="nb">echo</span> <span class="s2">"deb https://apt.kubernetes.io/ kubernetes-xenial main"</span> | <span class="nb">sudo tee</span> <span class="nt">-a</span> /etc/apt/sources.list.d/kubernetes.list
<span class="nb">sudo </span>apt-get update
<span class="nb">sudo </span>apt-get <span class="nb">install</span> <span class="nt">-y</span> kubectl
</code></pre></div></div>

<p>Install Krew and some good plugins:</p>

<div class="language-bash highlighter-rouge"><div class="highlight"><pre class="highlight"><code><span class="o">(</span>
  <span class="nb">set</span> <span class="nt">-x</span><span class="p">;</span> <span class="nb">cd</span> <span class="s2">"</span><span class="si">$(</span><span class="nb">mktemp</span> <span class="nt">-d</span><span class="si">)</span><span class="s2">"</span> <span class="o">&amp;&amp;</span>
  <span class="nv">OS</span><span class="o">=</span><span class="s2">"</span><span class="si">$(</span><span class="nb">uname</span> | <span class="nb">tr</span> <span class="s1">'[:upper:]'</span> <span class="s1">'[:lower:]'</span><span class="si">)</span><span class="s2">"</span> <span class="o">&amp;&amp;</span>
  <span class="nv">ARCH</span><span class="o">=</span><span class="s2">"</span><span class="si">$(</span><span class="nb">uname</span> <span class="nt">-m</span> | <span class="nb">sed</span> <span class="nt">-e</span> <span class="s1">'s/x86_64/amd64/'</span> <span class="nt">-e</span> <span class="s1">'s/\(arm\)\(64\)\?.*/\1\2/'</span> <span class="nt">-e</span> <span class="s1">'s/aarch64$/arm64/'</span><span class="si">)</span><span class="s2">"</span> <span class="o">&amp;&amp;</span>
  <span class="nv">KREW</span><span class="o">=</span><span class="s2">"krew-</span><span class="k">${</span><span class="nv">OS</span><span class="k">}</span><span class="s2">_</span><span class="k">${</span><span class="nv">ARCH</span><span class="k">}</span><span class="s2">"</span> <span class="o">&amp;&amp;</span>
  curl <span class="nt">-fsSLO</span> <span class="s2">"https://github.com/kubernetes-sigs/krew/releases/latest/download/</span><span class="k">${</span><span class="nv">KREW</span><span class="k">}</span><span class="s2">.tar.gz"</span> <span class="o">&amp;&amp;</span>
  <span class="nb">tar </span>zxvf <span class="s2">"</span><span class="k">${</span><span class="nv">KREW</span><span class="k">}</span><span class="s2">.tar.gz"</span> <span class="o">&amp;&amp;</span>
  ./<span class="s2">"</span><span class="k">${</span><span class="nv">KREW</span><span class="k">}</span><span class="s2">"</span> <span class="nb">install </span>krew
<span class="o">)</span>
</code></pre></div></div>

<p>The plugins (you can install more <a href="https://krew.sigs.k8s.io/plugins/">here</a>):</p>

<div class="language-bash highlighter-rouge"><div class="highlight"><pre class="highlight"><code>k krew <span class="nb">install </span>ns
k krew <span class="nb">install </span>ctx
k krew <span class="nb">install </span>tree
k krew <span class="nb">install </span>view-secret
k krew <span class="nb">install </span>modify-secret
...
</code></pre></div></div>

<p>Install helm:</p>

<div class="language-bash highlighter-rouge"><div class="highlight"><pre class="highlight"><code>curl https://raw.githubusercontent.com/helm/helm/master/scripts/get-helm-3 | bash
</code></pre></div></div>

<p>MetalLB instalation for LoadBalancer:</p>

<div class="language-bash highlighter-rouge"><div class="highlight"><pre class="highlight"><code>kubectl apply <span class="nt">-f</span> https://raw.githubusercontent.com/metallb/metallb/v0.13.7/config/manifests/metallb-native.yaml
</code></pre></div></div>

<p>You have to wait for the pods to be ready:</p>

<div class="language-bash highlighter-rouge"><div class="highlight"><pre class="highlight"><code>kubectl get pods <span class="nt">-n</span> metallb-system
NAME                          READY   STATUS    RESTARTS   AGE
controller-789c75c689-x8rd9   1/1     Running   0          100s
speaker-cxw6j                 1/1     Running   0          100s

</code></pre></div></div>

<p>Traefik installation:</p>

<div class="language-bash highlighter-rouge"><div class="highlight"><pre class="highlight"><code>k create ns traefik <span class="o">&amp;&amp;</span> k ns traefik
helm repo add traefik https://helm.traefik.io/traefik
helm repo update
helm <span class="nb">install </span>traefik traefik/traefik
</code></pre></div></div>

<p>If the load balancer is not ready, you need to check the ports:</p>

<div class="language-bash highlighter-rouge"><div class="highlight"><pre class="highlight"><code>k get svc <span class="nt">-n</span> traefik
NAME      TYPE           CLUSTER-IP     EXTERNAL-IP   PORT<span class="o">(</span>S<span class="o">)</span>                      AGE
traefik   LoadBalancer   10.96.145.19   &lt;pending&gt;     80:32699/TCP,443:30199/TCP   3m32s
</code></pre></div></div>

<p>And now you will need to change the ports in the Traefik configuration:</p>

<p>You need to put the ports 80 and 443 in the ports 30167 and 30794:</p>

<div class="language-bash highlighter-rouge"><div class="highlight"><pre class="highlight"><code>k edit svc traefik <span class="nt">-n</span> traefik
</code></pre></div></div>

<p>Finally we only need to adjust the metallb configuration:</p>

<div class="language-yaml highlighter-rouge"><div class="highlight"><pre class="highlight"><code><span class="na">apiVersion</span><span class="pi">:</span> <span class="s">metallb.io/v1beta1</span>
<span class="na">kind</span><span class="pi">:</span> <span class="s">IPAddressPool</span>
<span class="na">metadata</span><span class="pi">:</span>
  <span class="na">name</span><span class="pi">:</span> <span class="s">example</span>
  <span class="na">namespace</span><span class="pi">:</span> <span class="s">metallb-system</span>
<span class="na">spec</span><span class="pi">:</span>
  <span class="na">addresses</span><span class="pi">:</span>
  <span class="pi">-</span> <span class="s">172.18.255.200-172.18.255.250</span>
<span class="nn">---</span>
<span class="na">apiVersion</span><span class="pi">:</span> <span class="s">metallb.io/v1beta1</span>
<span class="na">kind</span><span class="pi">:</span> <span class="s">L2Advertisement</span>
<span class="na">metadata</span><span class="pi">:</span>
  <span class="na">name</span><span class="pi">:</span> <span class="s">empty</span>
  <span class="na">namespace</span><span class="pi">:</span> <span class="s">metallb-system</span>
</code></pre></div></div>

<p>Let’s publish a simple web to check if everything is working:</p>

<p>First we are going to allow traefik to across the namespace:</p>

<div class="language-bash highlighter-rouge"><div class="highlight"><pre class="highlight"><code>kubectl edit deploy traefik <span class="nt">-n</span> traefik
</code></pre></div></div>

<p>Add this line to args</p>

<div class="language-yaml highlighter-rouge"><div class="highlight"><pre class="highlight"><code><span class="nn">...</span>
<span class="pi">-</span> <span class="s">--providers.kubernetescrd.allowCrossNamespace=true</span>
<span class="nn">...</span>
</code></pre></div></div>

<p>Create a namespace:</p>

<div class="language-bash highlighter-rouge"><div class="highlight"><pre class="highlight"><code>kubectl create ns tests <span class="o">&amp;&amp;</span> kubectl ns tests
</code></pre></div></div>

<p>A deployment:</p>

<div class="language-yaml highlighter-rouge"><div class="highlight"><pre class="highlight"><code><span class="na">apiVersion</span><span class="pi">:</span> <span class="s">apps/v1</span>
<span class="na">kind</span><span class="pi">:</span> <span class="s">Deployment</span>
<span class="na">metadata</span><span class="pi">:</span>
  <span class="na">name</span><span class="pi">:</span> <span class="s">apache-deployment</span>
<span class="na">spec</span><span class="pi">:</span>
  <span class="na">selector</span><span class="pi">:</span>
    <span class="na">matchLabels</span><span class="pi">:</span>
      <span class="na">app</span><span class="pi">:</span> <span class="s">apache2</span>
  <span class="na">replicas</span><span class="pi">:</span> <span class="m">1</span> <span class="c1"># tells deployment to run 2 pods matching the template</span>
  <span class="na">template</span><span class="pi">:</span>
    <span class="na">metadata</span><span class="pi">:</span>
      <span class="na">labels</span><span class="pi">:</span>
        <span class="na">app</span><span class="pi">:</span> <span class="s">apache2</span>
    <span class="na">spec</span><span class="pi">:</span>
      <span class="na">containers</span><span class="pi">:</span>
      <span class="pi">-</span> <span class="na">name</span><span class="pi">:</span> <span class="s">apache2</span>
        <span class="na">image</span><span class="pi">:</span> <span class="s">httpd</span>
        <span class="na">ports</span><span class="pi">:</span>
        <span class="pi">-</span> <span class="na">containerPort</span><span class="pi">:</span> <span class="m">80</span>
</code></pre></div></div>

<p>The service:</p>

<div class="language-yaml highlighter-rouge"><div class="highlight"><pre class="highlight"><code><span class="na">apiVersion</span><span class="pi">:</span> <span class="s">v1</span>
<span class="na">kind</span><span class="pi">:</span> <span class="s">Service</span>
<span class="na">metadata</span><span class="pi">:</span>
  <span class="na">labels</span><span class="pi">:</span>
    <span class="na">app.kubernetes.io/instance</span><span class="pi">:</span> <span class="s">traefik</span>
  <span class="na">name</span><span class="pi">:</span> <span class="s">apache2</span>
<span class="na">spec</span><span class="pi">:</span>
  <span class="na">type</span><span class="pi">:</span> <span class="s">ClusterIP</span>
  <span class="na">internalTrafficPolicy</span><span class="pi">:</span> <span class="s">Cluster</span>
  <span class="na">ipFamilies</span><span class="pi">:</span>
  <span class="pi">-</span> <span class="s">IPv4</span>
  <span class="na">ipFamilyPolicy</span><span class="pi">:</span> <span class="s">SingleStack</span>
  <span class="na">ports</span><span class="pi">:</span>
  <span class="pi">-</span> <span class="na">port</span><span class="pi">:</span> <span class="m">80</span>
  <span class="na">selector</span><span class="pi">:</span>
    <span class="na">app</span><span class="pi">:</span> <span class="s">apache2</span>
</code></pre></div></div>

<p>And the ingress:</p>

<div class="language-yaml highlighter-rouge"><div class="highlight"><pre class="highlight"><code><span class="na">apiVersion</span><span class="pi">:</span> <span class="s">traefik.containo.us/v1alpha1</span>
<span class="na">kind</span><span class="pi">:</span> <span class="s">IngressRoute</span>
<span class="na">metadata</span><span class="pi">:</span>
  <span class="na">labels</span><span class="pi">:</span>
    <span class="na">app.kubernetes.io/instance</span><span class="pi">:</span> <span class="s">traefik</span>
  <span class="na">name</span><span class="pi">:</span> <span class="s">213.136.89.166</span>
  <span class="na">namespace</span><span class="pi">:</span> <span class="s">traefik</span>
<span class="na">spec</span><span class="pi">:</span>
  <span class="na">entryPoints</span><span class="pi">:</span>
  <span class="pi">-</span> <span class="s">web</span>
  <span class="na">routes</span><span class="pi">:</span>
  <span class="pi">-</span> <span class="na">kind</span><span class="pi">:</span> <span class="s">Rule</span>
    <span class="na">match</span><span class="pi">:</span> <span class="s">Host(`213.136.89.166`)</span>
    <span class="na">services</span><span class="pi">:</span>
    <span class="pi">-</span> <span class="na">kind</span><span class="pi">:</span> <span class="s">Service</span>
      <span class="na">name</span><span class="pi">:</span> <span class="s">apache2</span>
      <span class="na">namespace</span><span class="pi">:</span> <span class="s">tests</span>
      <span class="na">port</span><span class="pi">:</span> <span class="m">80</span>
</code></pre></div></div>

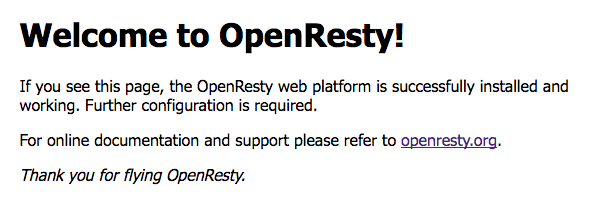
<p>Beautiful screen when you go to the IP:</p>

<p><a href="/attachments/it_works.png"><img src="/attachments/it_works.png" alt="it-works" /></a></p>]]></content><author><name>Moncho Pena</name></author><category term="kubernetes" /><category term="kind" /><category term="testing" /><category term="virtual" /><category term="machine" /><summary type="html"><![CDATA[I created a VPS with 16GB of RAM and 6 CPU to test my applications in a Kubernetes cluster.]]></summary></entry><entry><title type="html">Testing Vitess: Scalable, Reliable, MySQL-compatible</title><link href="https://moncho.cloud/kubernetes/mysql/testing/2022/12/19/vitess-mysql-compatible-database.html" rel="alternate" type="text/html" title="Testing Vitess: Scalable, Reliable, MySQL-compatible" /><published>2022-12-19T16:00:00-06:00</published><updated>2022-12-19T16:00:00-06:00</updated><id>https://moncho.cloud/kubernetes/mysql/testing/2022/12/19/vitess-mysql-compatible-database</id><content type="html" xml:base="https://moncho.cloud/kubernetes/mysql/testing/2022/12/19/vitess-mysql-compatible-database.html"><![CDATA[<p>As you know, for samples, I like to use Wordpress, because this “blog cms” has specific problems when you want to deploy in <a href="https://kubernetes.io/">K8s</a>.</p>

<p>I always prayed for a easy scalable database compatible with <a href="https://www.mysql.com/">MySQL</a>. So go to the point. Of course you will need to have a <a href="https://kubernetes.io/">K8s</a> cluster.</p>

<p>Create the namespace:</p>

<div class="language-plaintext highlighter-rouge"><div class="highlight"><pre class="highlight"><code>k create ns vitess &amp; k ns vitess
</code></pre></div></div>

<p>Clone the repo of <a href="https://vitess.io/">Vitess</a>:</p>

<div class="language-plaintext highlighter-rouge"><div class="highlight"><pre class="highlight"><code>git clone https://github.com/vitessio/vitess
cd vitess/examples/operator
</code></pre></div></div>

<p>Install the operator:</p>

<div class="language-plaintext highlighter-rouge"><div class="highlight"><pre class="highlight"><code>kubectl apply -f operator.yaml
</code></pre></div></div>

<p>Wait …</p>

<div class="language-plaintext highlighter-rouge"><div class="highlight"><pre class="highlight"><code>k get pods                                     
NAME                               READY   STATUS    RESTARTS   AGE
vitess-operator-69f65546b7-zpht5   1/1     Running   0          87s
</code></pre></div></div>

<p>Now we have the operator we can start with the samples.
The first one starts the cluster:</p>

<div class="language-plaintext highlighter-rouge"><div class="highlight"><pre class="highlight"><code>k apply -f 101_initial_cluster.yaml
</code></pre></div></div>

<p>After a cup of 🍵 …</p>

<div class="language-plaintext highlighter-rouge"><div class="highlight"><pre class="highlight"><code>example-commerce-x-x-zone1-vtorc-c13ef6ff-54d657995f-nkjfp   1/1     Running   3 (126m ago)   129m
example-etcd-faf13de3-1                                      1/1     Running   1 (126m ago)   129m
example-etcd-faf13de3-2                                      1/1     Running   1 (126m ago)   129m
example-etcd-faf13de3-3                                      1/1     Running   1 (126m ago)   129m
example-vttablet-zone1-2469782763-bfadd780                   3/3     Running   2 (126m ago)   129m
example-vttablet-zone1-2548885007-46a852d0                   3/3     Running   2 (126m ago)   129m
example-zone1-vtadmin-c03d7eae-7f46bfcd7c-qhpk8              2/2     Running   0              129m
example-zone1-vtctld-1d4dcad0-5db7c9799d-wrxf5               1/1     Running   3 (126m ago)   129m
example-zone1-vtgate-bc6cde92-7f6dccb697-vfmkr               1/1     Running   3 (126m ago)   129m
vitess-operator-79bd947f7b-sgtd5                             1/1     Running   0              129m
</code></pre></div></div>

<p>There’s a bash script to create all “port-forwards” for services, but for this blog entry we are going to focus only in the connection to mysql.</p>

<p>We need to discover where’s the svc for “vtgate”</p>

<div class="language-plaintext highlighter-rouge"><div class="highlight"><pre class="highlight"><code>kubectl get service --selector="planetscale.com/component=vtgate,planetscale.com/cell"
</code></pre></div></div>
<p>With the result:</p>

<div class="language-plaintext highlighter-rouge"><div class="highlight"><pre class="highlight"><code>k port-forward --address 0.0.0.0  svc/example-zone1-vtgate-bc6cde92  15306:3306
</code></pre></div></div>

<p>Let’s connect to the database with:</p>

<div class="language-plaintext highlighter-rouge"><div class="highlight"><pre class="highlight"><code>mysql -h 127.0.0.1 -P 15306 -u user
...
show databases;
</code></pre></div></div>

<p>You are seeing the database commerce. Let’s connect one application to this</p>

<p>For simplify we’ll do it with helm. The most important thing is the values. This is a sample of the file values.yaml:</p>

<div class="language-plaintext highlighter-rouge"><div class="highlight"><pre class="highlight"><code>## WordPress Settings
wordpressUsername: test
wordpressPassword: test
wordpressEmail: moncho@pena.com
wordpressFirstName: Moncho
wordpressLastName: Pena
wordpressBlogName: My Blog!

## Database Settings
externalDatabase:
  host: example-zone1-vtgate-bc6cde92.vitess.svc.cluster.local 
  user: user
  password: ""
  database: commerce
  port: 3306

## Enable Maria DB
mariadb:
  enabled: false
</code></pre></div></div>

<p>The most important part is to point to the service located into namespace vitess: <code class="language-plaintext highlighter-rouge">example-zone1-vtgate-bc6cde92.vitess.svc.cluster.local</code></p>

<div class="language-plaintext highlighter-rouge"><div class="highlight"><pre class="highlight"><code>k create ns wordpress &amp;&amp; k ns wordpress
helm repo add bitnami https://charts.bitnami.com/bitnami
helm repo update
helm install myblog -f values.yaml bitnami/wordpress
</code></pre></div></div>

<p>Wait a few seconds:</p>

<div class="language-plaintext highlighter-rouge"><div class="highlight"><pre class="highlight"><code>k get pods                                          
NAME                                READY   STATUS    RESTARTS   AGE
myblog-wordpress-76cb978894-vwlm8   1/1     Running   0          11m
</code></pre></div></div>

<p>Let’s take a look 👀 to the database:</p>

<div class="language-plaintext highlighter-rouge"><div class="highlight"><pre class="highlight"><code>MySQL [commerce]&gt; show tables;
+-----------------------+
| Tables_in_commerce    |
+-----------------------+
| wp_commentmeta        |
| wp_comments           |
| wp_links              |
| wp_options            |
| wp_postmeta           |
| wp_posts              |
| wp_term_relationships |
| wp_term_taxonomy      |
| wp_termmeta           |
| wp_terms              |
| wp_usermeta           |
| wp_users              |
+-----------------------+
12 rows in set (0.004 sec)
</code></pre></div></div>

<p>It works. A WP pointing to <a href="https://vitess.io/">Vitess</a> … Simply awesome.</p>]]></content><author><name>Moncho Pena</name></author><category term="kubernetes" /><category term="mysql" /><category term="testing" /><summary type="html"><![CDATA[As you know, for samples, I like to use Wordpress, because this “blog cms” has specific problems when you want to deploy in K8s.]]></summary></entry><entry><title type="html">Your own hosting like a boss (5 of 5)</title><link href="https://moncho.cloud/hosting/portainer/docker/github/actions/2022/06/11/your-own-hosting-like-a-boss-5-of-5.html" rel="alternate" type="text/html" title="Your own hosting like a boss (5 of 5)" /><published>2022-06-11T17:00:00-05:00</published><updated>2022-06-11T17:00:00-05:00</updated><id>https://moncho.cloud/hosting/portainer/docker/github/actions/2022/06/11/your-own-hosting-like-a-boss-5-of-5</id><content type="html" xml:base="https://moncho.cloud/hosting/portainer/docker/github/actions/2022/06/11/your-own-hosting-like-a-boss-5-of-5.html"><![CDATA[<p>The idea:
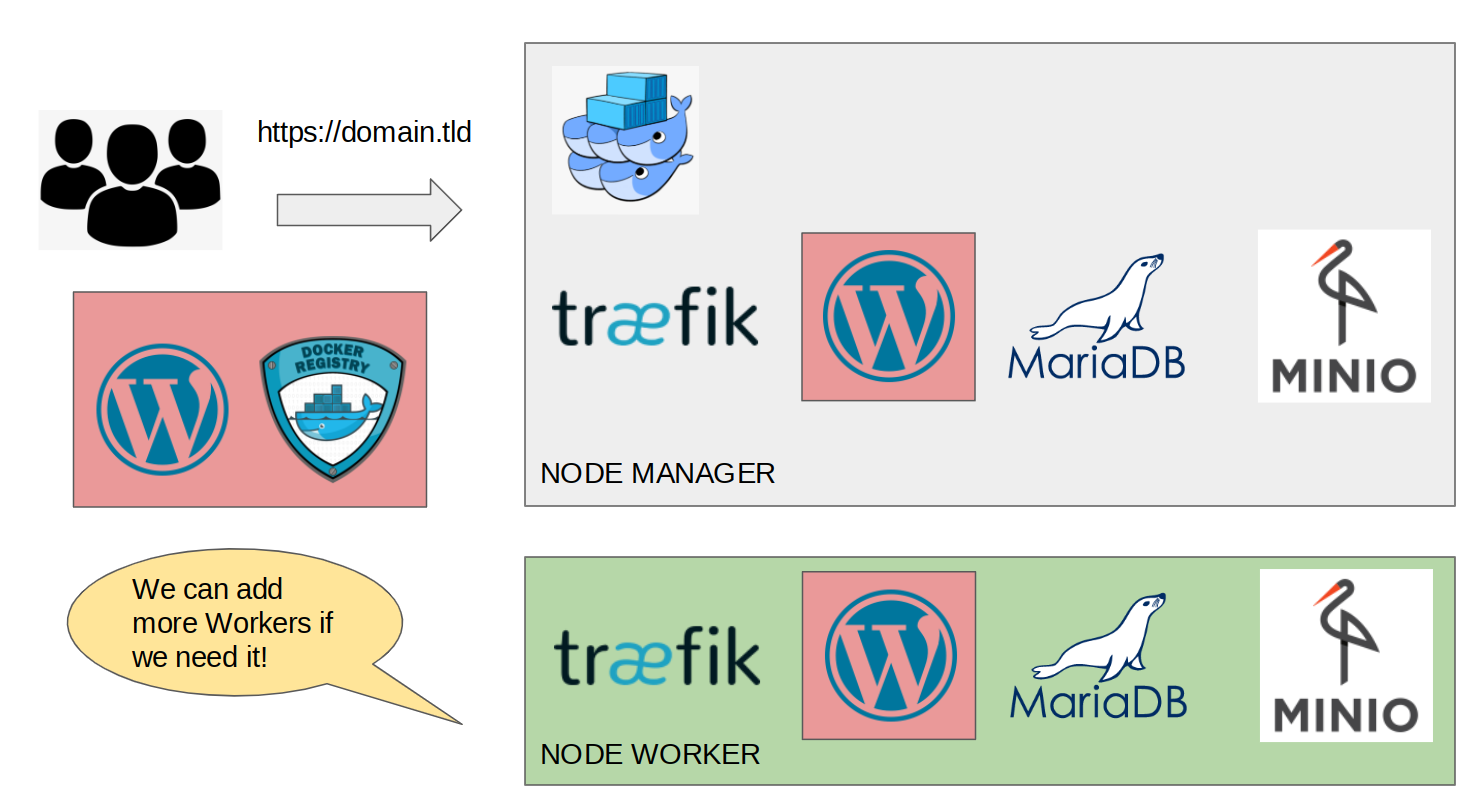
<img src="/attachments/wordpress-docker-swarm-schema.png" alt="wordpress-docker-swarm-schema" title="Wordpress Docker Swarm" /></p>

<p>Understanding the graph:</p>

<ul>
  <li>
    <p>Why should we use Minio? In this sample I’m using Minio, but if you prefer you could use a similar alternative for <a href="https://en.wikipedia.org/wiki/Object_storage">Object Storage</a>, the most knowed is <a href="https://aws.amazon.com/es/pm/serv-s3/">Amazon S3</a>, but <a href="https://try.digitalocean.com/cloud-storage/https://mariadb.org/">Digital Ocean</a> has one too. If your team uses Git (a usual situation at 2022) you probably know that WP save images into a directory called <a href="https://es.wordpress.org/support/topic/wp-content-uploads/">wp-content</a>, this could be a mess if you add these images to the repository. Another good thing is you are going to have a nice distributed system, your own <a href="https://en.wikipedia.org/wiki/Content_delivery_network">cdn</a>, and finally you will have the possibility to replicate the WP containers.</p>
  </li>
  <li>
    <p>With this arquitecture we have a base with 4 containers: <a href="https://wordpress.org/">Wordpress</a>, <a href="https://mariadb.org/">Maria DB</a>, <a href="https://min.io/">Minio</a> and <a href="https://doc.traefik.io/traefik/">Traefik</a>, and we can add more replicas, and much better we can add as workers as we need them.</p>
  </li>
</ul>

<p>Let’s do a quick test with only a simple <a href="https://docs.docker.com/compose/">Docker Compose</a> file.</p>

<div class="language-plaintext highlighter-rouge"><div class="highlight"><pre class="highlight"><code>mkdir wp
cd wp
mkdir mariadb_data &amp;&amp; chown 1001 mariadb_data
mkdir minio_data &amp;&amp; chown 1001 minio_data
mkdir wordpress_data &amp;&amp; chown 1001 wordpress_data
docker-compose up
</code></pre></div></div>

<p>Here the docker compose file:</p>

<div class="language-plaintext highlighter-rouge"><div class="highlight"><pre class="highlight"><code>version: '2'
services:
  mariadb:
    image: docker.io/bitnami/mariadb:10.6
    volumes:
      - './mariadb_data:/bitnami/mariadb'
    environment:
      # ALLOW_EMPTY_PASSWORD is recommended only for development.
      - ALLOW_EMPTY_PASSWORD=yes
      - MARIADB_USER=bn_wordpress
      - MARIADB_DATABASE=bitnami_wordpress
  wordpress:
    image: docker.io/bitnami/wordpress:5
    ports:
      - '8080:8080'
      - '8443:8443'
    volumes:
      - './wordpress_data:/bitnami/wordpress'
    depends_on:
      - mariadb
    environment:
      # ALLOW_EMPTY_PASSWORD is recommended only for development.
      - ALLOW_EMPTY_PASSWORD=yes
      - WORDPRESS_DATABASE_HOST=mariadb
      - WORDPRESS_DATABASE_PORT_NUMBER=3306
      - WORDPRESS_DATABASE_USER=bn_wordpress
      - WORDPRESS_DATABASE_NAME=bitnami_wordpress
  minio:
    image: docker.io/bitnami/minio:2022
    ports:
      - '9000:9000'
      - '9001:9001'
    environment:
      - MINIO_ROOT_USER=minioadmin
      - MINIO_ROOT_PASSWORD=minioadmin
    volumes:
      - './minio_data:/data'
</code></pre></div></div>

<p>You can download the file <a href="https://github.com/monchopena/your-own-hosting-like-a-boss-files/blob/main/wordpress/docker-compose.yaml">here</a>.</p>

<p>If everything wen fine you now should go to WP Login Page <a href="http://localhost:8080/wp-login.php">http://localhost:8080/wp-login.php</a>.</p>

<div class="language-plaintext highlighter-rouge"><div class="highlight"><pre class="highlight"><code>user: user
pass: bitnami
</code></pre></div></div>

<p>How can I access to Minio? From this url: <a href="http://localhost:9001/login">http://localhost:9001/login</a>. You should see the credentials into the docker-compose file 😀.</p>

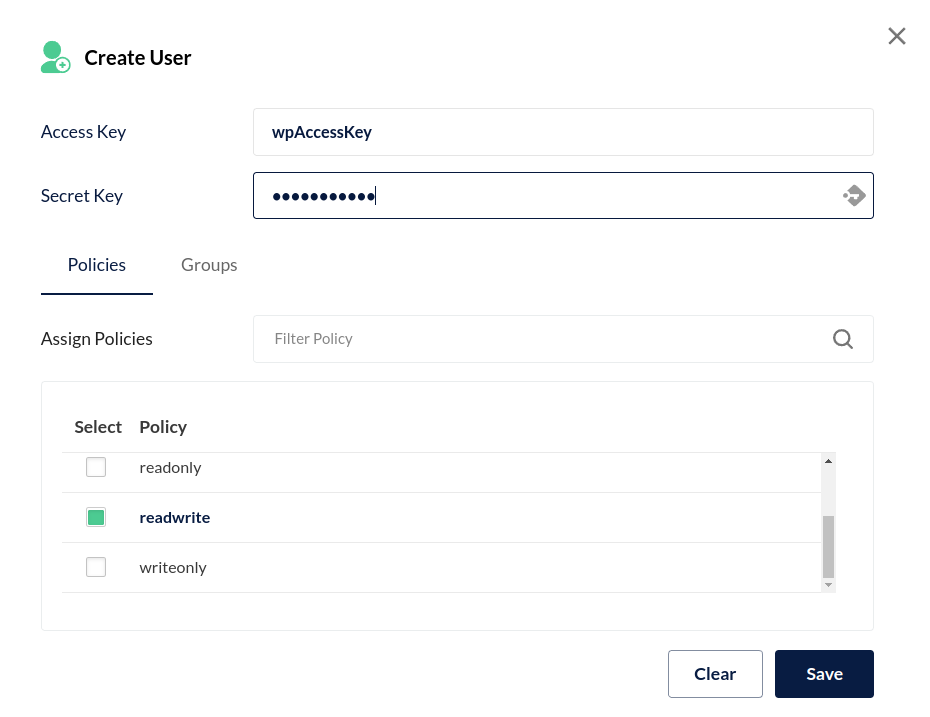
<p>Create a new user with read and write permissions:</p>

<p><img src="/attachments/minio-create-user.png" alt="minio-create-user" title="Minio Create a User" /></p>

<p>Create a new bucket with (Important!) “Public Access”.</p>

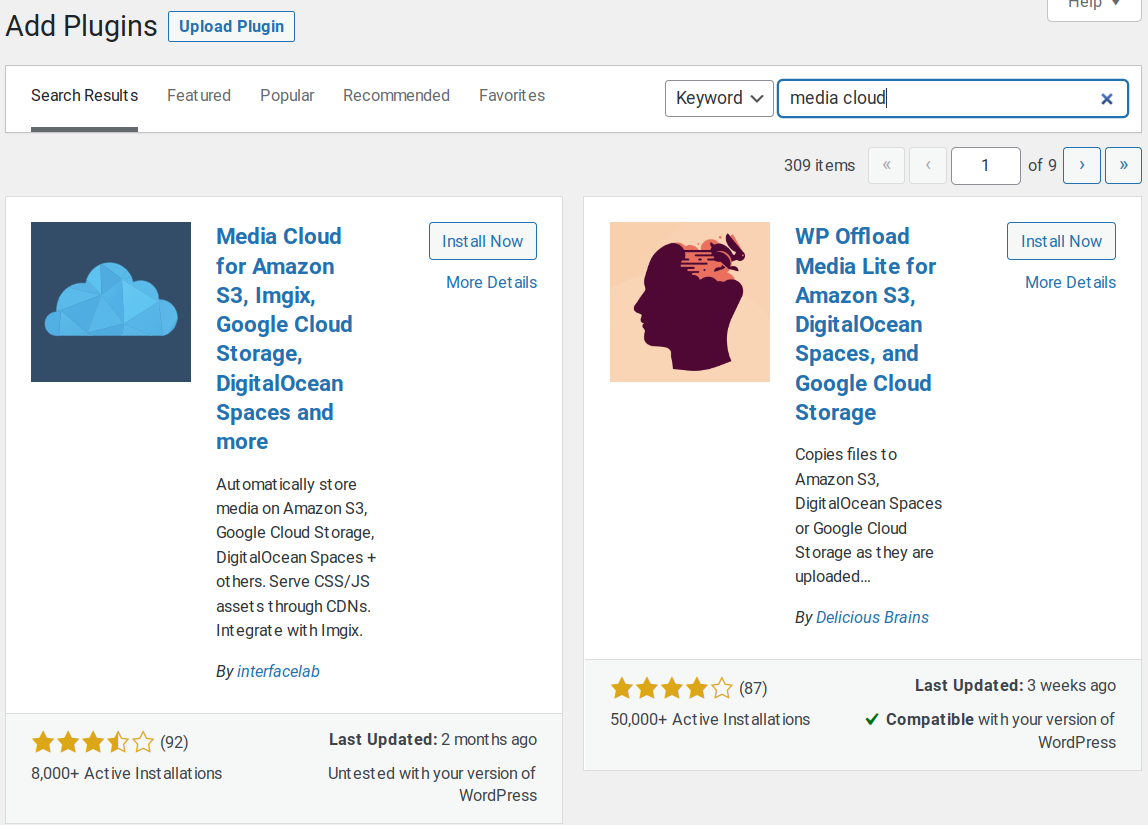
<p>And now we are going to install a useful plugin.</p>

<p><img src="/attachments/wordpress-docker-media-cloud-install.png" alt="wordpress-docker-media-cloud-install" title="Wordpress Install Media Cloud Plugin" /></p>

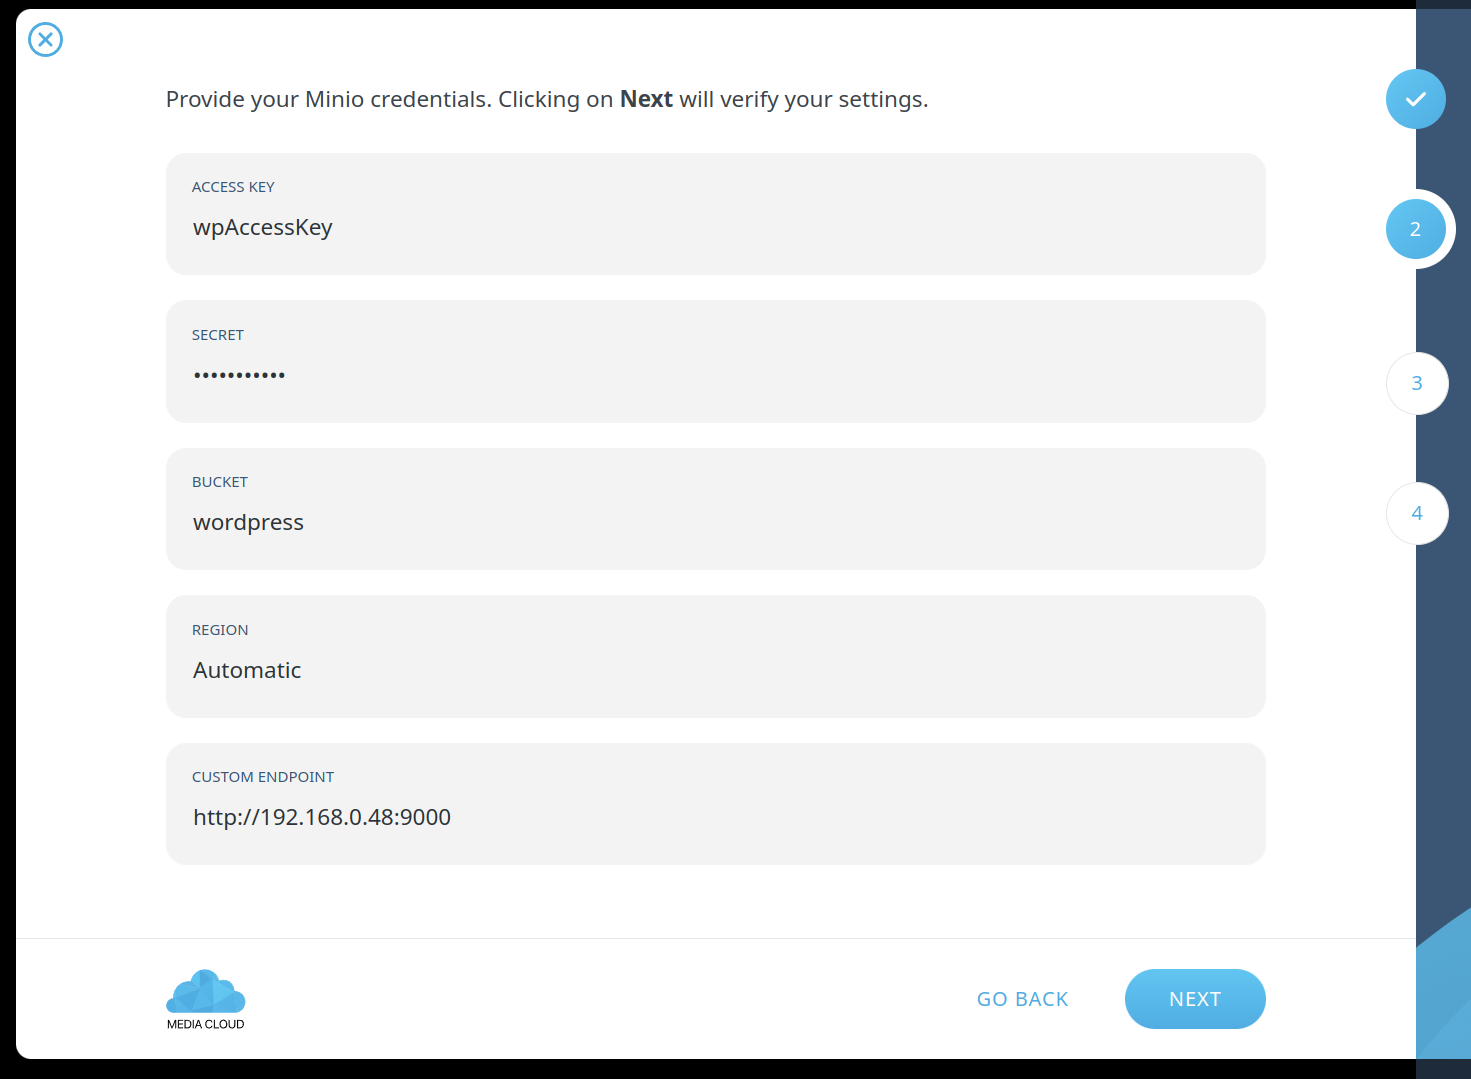
<p>Awesome, you will see a “wizard setup” with the Minio option. Fill the fields:</p>

<p><img src="/attachments/minio-wp-configuration.png" alt="minio-wp-configuration" title="Minio WP Configuration" /></p>

<p>NOTE: as you noticed, the URL in this case is in a local network (http://192.168.0.48:9000). Remember: wordpress should access to this url to upload and show objects.</p>

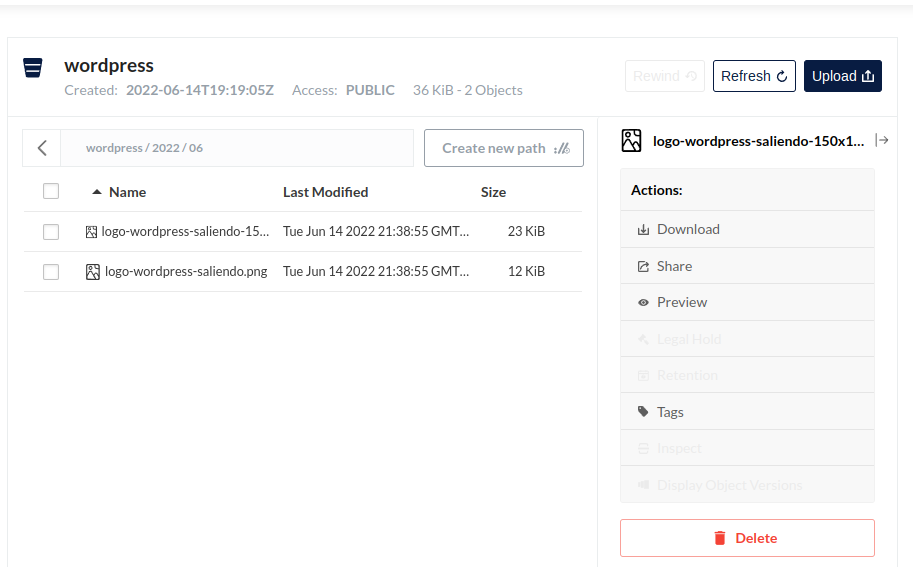
<p>Add a image to the “Media” section. If you take a look into the Minio Admin Tool, you will see the images uploaded.</p>

<p><img src="/attachments/minio-wp-bucket.png" alt="minio-wp-bucket" title="Minio WP Bucket" /></p>

<p>Let’s do a quick test now. We have 2 machines with docker installed. You are going to choose one of them to work as a master.</p>

<p>This is a simple yaml with the configuation with Traefik and Portainer. For simplify we are not going to use SSL, but it should be very easy to add a web secure access.</p>

<div class="language-plaintext highlighter-rouge"><div class="highlight"><pre class="highlight"><code>version: "3.3"

services:
  traefik:
    image: "traefik:latest"
    command:
      - --api.dashboard=true
      - --api.insecure=true
      - --entrypoints.web.address=:80
      - --providers.docker
    ports:
      - "80:80"
    volumes:
      - "/var/run/docker.sock:/var/run/docker.sock:ro"
    labels:
      - "traefik.enable=true"
      # Dashboard
      # Take care of the domain
      - "traefik.http.routers.traefik-public.rule=Host(`traefik.local`)"
      - "traefik.http.routers.traefik-public.entrypoints=web"
      - "traefik.http.services.traefik-public.loadbalancer.server.port=8080"
      - "traefik.http.routers.traefik-public.service=api@internal"

  portainer:
    image: portainer/portainer-ce:latest
    command: -H unix:///var/run/docker.sock
    volumes:
      - /var/run/docker.sock:/var/run/docker.sock
      - portainer_data:/data
    deploy:
      mode: replicated
      replicas: 1
      placement:
        constraints: [node.role == manager]
    labels:
      - "traefik.enable=true"
      # Frontend
      # Take care of the domain
      - "traefik.http.routers.frontend.rule=Host(`portainer.local`)"
      - "traefik.http.routers.frontend.entrypoints=web"
      - "traefik.http.services.frontend.loadbalancer.server.port=9000"
      - "traefik.http.routers.frontend.service=frontend"

volumes:
  portainer_data:
</code></pre></div></div>

<p>You can download the file <a href="https://github.com/monchopena/your-own-hosting-like-a-boss-files/blob/main/portainer/stack.yaml">here</a>.</p>

<p>If you are working in a local networks it’s a good idea to create “fake domains” into your “/etc/hosts”. Sample with the server IP:</p>

<div class="language-plaintext highlighter-rouge"><div class="highlight"><pre class="highlight"><code>192.168.0.94    traefik.local
192.168.0.94    portainer.local
192.168.0.94    wordpress.local
192.168.0.94    minio.local
192.168.0.94    minio.admin.local
</code></pre></div></div>

<p>Run this commands into the server 192.168.0.94.</p>

<div class="language-plaintext highlighter-rouge"><div class="highlight"><pre class="highlight"><code>docker network create wordpress_network --scope swarm
docker swarm init
docker stack deploy -c portainer.yaml portainer
</code></pre></div></div>

<p>If every thing it’s ok you can go to Portainer from http://portainer.local and add this minimal stack of wordpress:</p>

<div class="language-plaintext highlighter-rouge"><div class="highlight"><pre class="highlight"><code>version: '3'

volumes:
  db_data:
  wordpress_data:
  minio_data:

networks:
  wordpress_network:
  portainer_default:
    external: true

services:
  mariadb:
    image: docker.io/bitnami/mariadb:10.6
    networks:
      - wordpress_network
    volumes:
      - 'db_data:/bitnami/mariadb'
    environment:
      # ALLOW_EMPTY_PASSWORD is recommended only for development.
      - ALLOW_EMPTY_PASSWORD=yes
      - MARIADB_USER=bn_wordpress
      - MARIADB_DATABASE=bitnami_wordpress
  wordpress:
    image: docker.io/bitnami/wordpress:6
    networks:
      - wordpress_network
      - portainer_default
    volumes:
      - 'wordpress_data:/bitnami/wordpress'
    depends_on:
      - mariadb
    environment:
      # ALLOW_EMPTY_PASSWORD is recommended only for development.
      - ALLOW_EMPTY_PASSWORD=yes
      - WORDPRESS_DATABASE_HOST=mariadb
      - WORDPRESS_DATABASE_PORT_NUMBER=3306
      - WORDPRESS_DATABASE_USER=bn_wordpress
      - WORDPRESS_DATABASE_NAME=bitnami_wordpress
    labels:
      - "traefik.enable=true"
      # Frontend
      # Take care of the domain
      - "traefik.docker.network=portainer_default"
      - "traefik.http.routers.wordpress.rule=Host(`wordpress.local`)"
      - "traefik.http.routers.wordpress.entrypoints=web"
      - "traefik.http.services.wordpress.loadbalancer.server.port=8080"
      - "traefik.http.routers.wordpress.service=wordpress"
  minio:
    image: docker.io/bitnami/minio:2022
    networks:
      - wordpress_network
      - portainer_default
    environment:
      - MINIO_ROOT_USER=minioadmin
      - MINIO_ROOT_PASSWORD=minioadmin
    volumes:
      - 'minio_data:/data'
    labels:
      - "traefik.enable=true"
      # Frontend
      # Take care of the domain
      - "traefik.docker.network=portainer_default"
      - "traefik.http.routers.minio.rule=Host(`minio.local`)"
      - "traefik.http.routers.minio.entrypoints=web"
      - "traefik.http.services.minio.loadbalancer.server.port=9000"
      - "traefik.http.routers.minio.service=minio"
      # minio-admin
      - "traefik.http.routers.minio-admin.rule=Host(`minio.admin.local`)"
      - "traefik.http.routers.minio-admin.entrypoints=web"
      - "traefik.http.services.minio-admin.loadbalancer.server.port=9001"
      - "traefik.http.routers.minio-admin.service=minio"
</code></pre></div></div>

<p>You can download the file <a href="https://github.com/monchopena/your-own-hosting-like-a-boss-files/blob/main/wordpress/wordpress.yaml">here</a>.</p>

<p>If everything is ok you can go to Minio (http://minio.admin.local) and crete the bucket and the user. And then go to WP and configure the <a href="https://es.wordpress.org/plugins/ilab-media-tools/">Media Cloud Plugin</a>.</p>

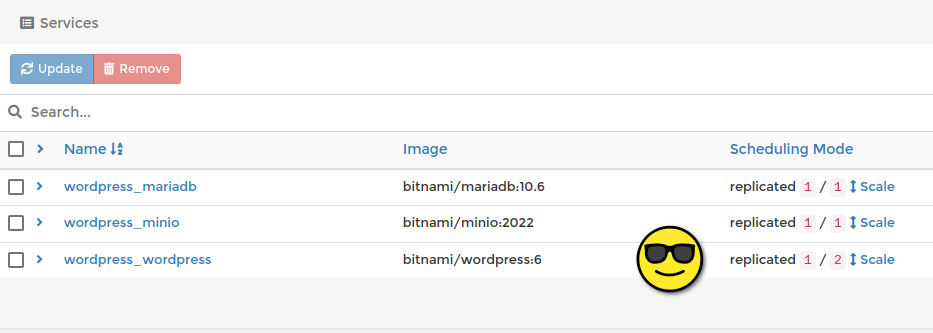
<p>Let’s add 2 replicas to Wordpress container:</p>

<p><img src="/attachments/wordpress-docker-replicas.png" alt="minio-wp-docker-replicas" title="WP Replicas" /></p>

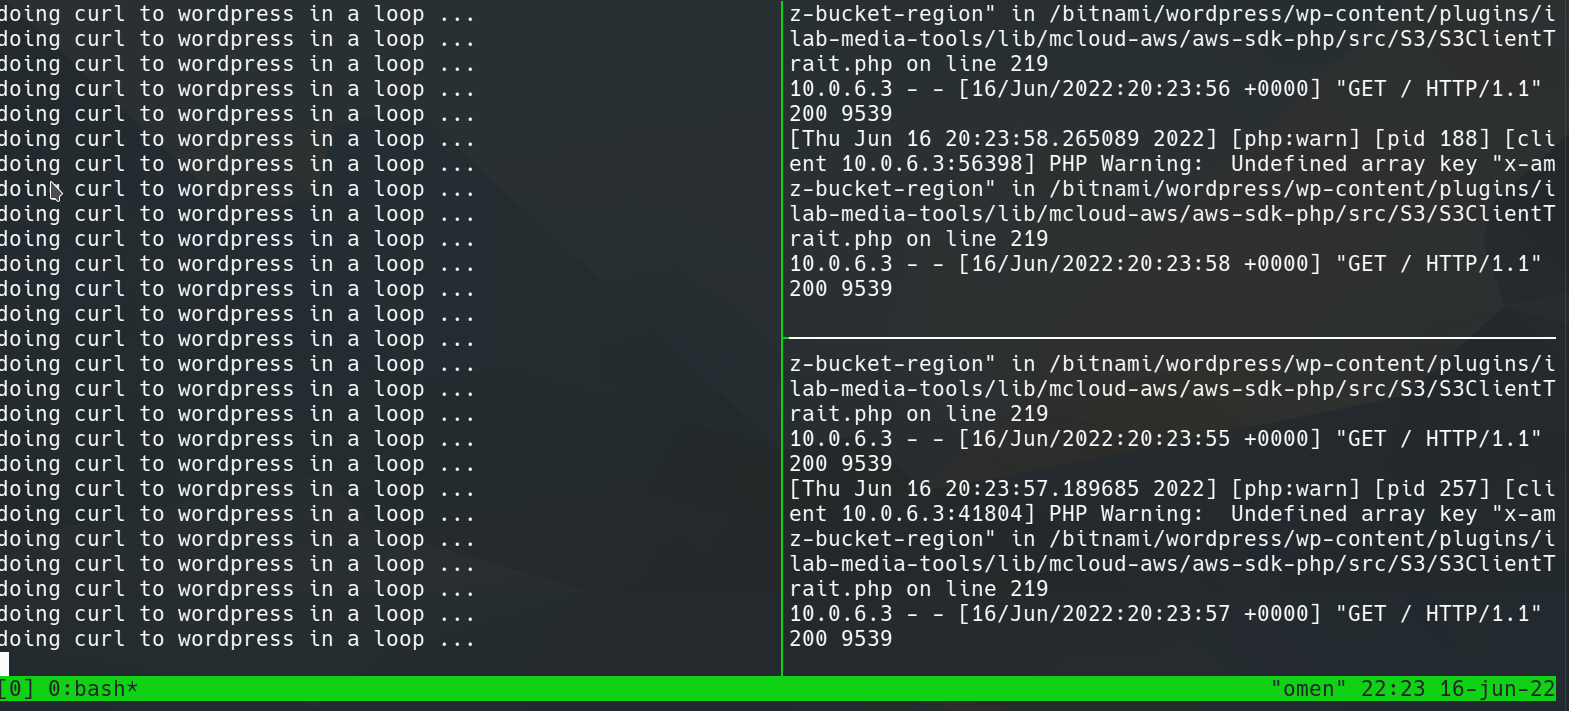
<p>And now go to the master server and log the 2 containers which are running wordpress.</p>

<div class="language-plaintext highlighter-rouge"><div class="highlight"><pre class="highlight"><code>docker logs -f 7da055fb1de5
...
</code></pre></div></div>

<p>The replicas are working and the traffic is balanced!!!</p>

<p><img src="/attachments/wordpress-docker-swarm-replicas-working.png" alt="wordpress-docker-swarm-replicas-working" title="WP replicas working" /></p>

<p>To see all nodes you are going to add to the cluster, in portainer you should install the “Portainer Agent”, write these commands:</p>

<div class="language-plaintext highlighter-rouge"><div class="highlight"><pre class="highlight"><code>docker network create \
  --driver overlay \
  portainer_agent_network

docker service create \
  --name portainer_agent \
  --network portainer_agent_network \
  -p 9001:9001/tcp \
  --mode global \
  --constraint 'node.platform.os == linux' \
  --mount type=bind,src=//var/run/docker.sock,dst=/var/run/docker.sock \
  --mount type=bind,src=//var/lib/docker/volumes,dst=/var/lib/docker/volumes \
  portainer/agent:2.13.1
</code></pre></div></div>

<p>And now the last thing. We are going to run a new server with docker and connect to master. First we need to know the token from the manager:</p>

<div class="language-plaintext highlighter-rouge"><div class="highlight"><pre class="highlight"><code>moncho@debianita:~$ docker swarm join-token worker
To add a worker to this swarm, run the following command:

    docker swarm join --token [here_the_huge_token] 192.168.0.94:2377

</code></pre></div></div>

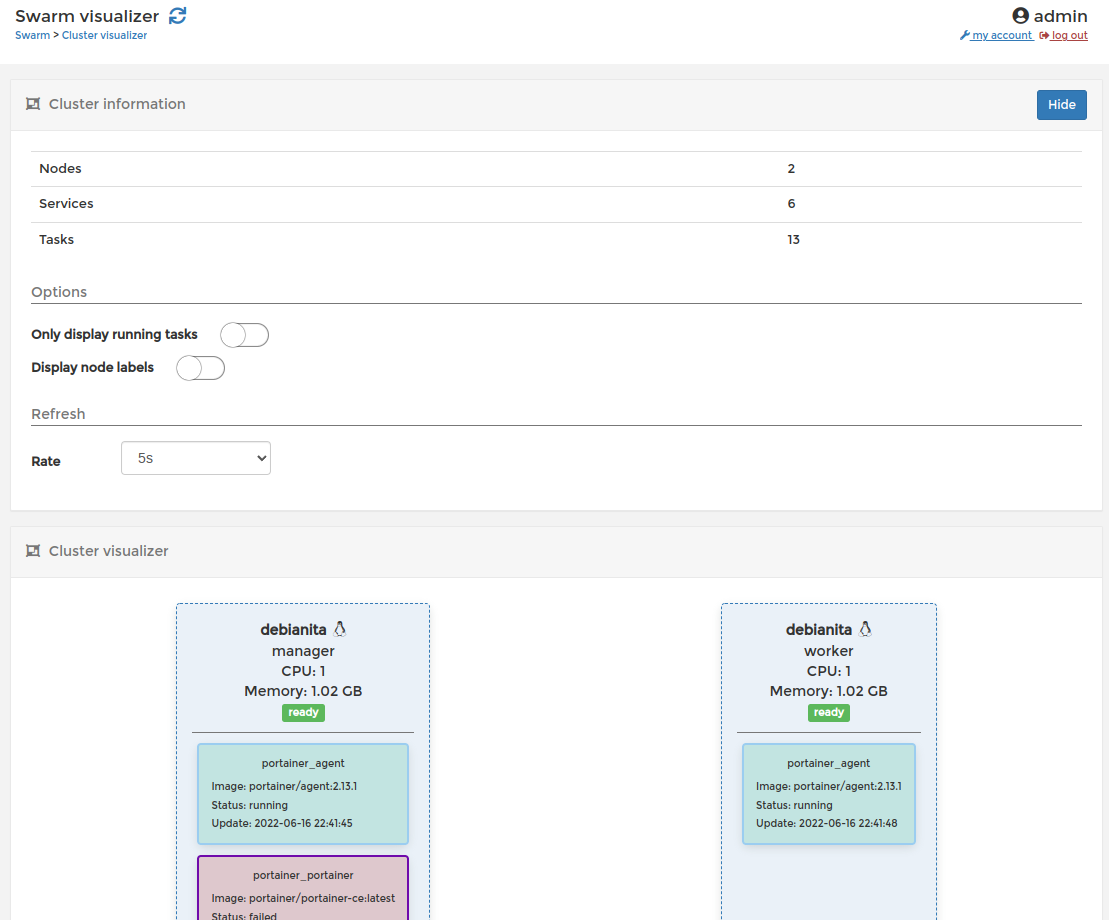
<p>Then we are going to run the command into the worker. If you see the message “This node joined a swarm as a worker.” then you are finished!. Now you can add how much workers as you want and then up the number of replicas, you can scale “to infinity and beyond!”.</p>

<p><img src="/attachments/wordpress-docker-swarm-visualizer.png" alt="wordpress-docker-swarm-visualize" title="Portainer Swarm Visualizer" /></p>

<p><strong>NOTE</strong>: I know “Docker Swarm” is going to be discontinued. But, in this moment, is included in the latest versions of Docker. So, it’s a good tool to understand how it works a cluster and in a easy mode start to work with containers like a Pro. In the future I will focus in <a href="https://kubernetes.io/">Kubernetes</a> because now I don’t have production projects in Docker Swarm 😀. See you soom (I do hope) in the next post.</p>]]></content><author><name>Moncho Pena</name></author><category term="hosting" /><category term="portainer" /><category term="docker" /><category term="github" /><category term="actions" /><summary type="html"><![CDATA[The idea:]]></summary></entry><entry><title type="html">Real IP with Traefik and K8s</title><link href="https://moncho.cloud/devops/2021/06/20/real-ip-traefik-amazon-elb.html" rel="alternate" type="text/html" title="Real IP with Traefik and K8s" /><published>2021-06-20T17:00:00-05:00</published><updated>2021-06-20T17:00:00-05:00</updated><id>https://moncho.cloud/devops/2021/06/20/real-ip-traefik-amazon-elb</id><content type="html" xml:base="https://moncho.cloud/devops/2021/06/20/real-ip-traefik-amazon-elb.html"><![CDATA[<p>The environment: <a href="https://kubernetes.io">K8s</a> + <a href="https://aws.amazon.com/elasticloadbalancing/">Amazon ELB</a> + <a href="https://doc.traefik.io/traefik/">Traefik</a>.</p>

<p>The problem:</p>

<div class="language-plaintext highlighter-rouge"><div class="highlight"><pre class="highlight"><code>curl -i https://yourdomain.com
...
X-Forwarded-For: 10.1.3.150
X-Forwarded-Host: yourdomain.com
X-Forwarded-Port: 443
X-Forwarded-Proto: https
X-Forwarded-Server: traefik-55c96f54d6-7cmfn
X-Real-Ip: 10.1.3.150
...
</code></pre></div></div>

<p>The X-Real-Ip is the IP of a node 😞.</p>

<p>The solution:</p>

<p>FIRST: You have to <a href="https://docs.aws.amazon.com/es_es/elasticloadbalancing/latest/classic/enable-proxy-protocol.html">Configure proxy protocol support for your Classic Load Balancer</a>.</p>

<p>As you can see ELB Amazon uses TCP, with HTTP or HTTPS protocol you don’t should to have this problem.</p>

<p><img src="/attachments/tcp-elb-amazon.png" alt="tcp-elb-amazon" title="TCP ELB Amazon" /></p>

<p>Steps to follow …</p>

<p>Add the policy:</p>

<div class="language-plaintext highlighter-rouge"><div class="highlight"><pre class="highlight"><code>aws elb create-load-balancer-policy --load-balancer-name name-of-the-balancer --policy-name traefik-ProxyProtocol-policy --policy-type-name ProxyProtocolPolicyType --policy-attributes AttributeName=ProxyProtocol,AttributeValue=true --region eu-central-1
</code></pre></div></div>

<p>Verify:</p>

<div class="language-plaintext highlighter-rouge"><div class="highlight"><pre class="highlight"><code>aws elb describe-load-balancers --load-balancer-name name-of-the-balancer --region eu-central-1 | grep traefik -A 5 -B 5 
</code></pre></div></div>

<p>You will see:</p>

<div class="language-plaintext highlighter-rouge"><div class="highlight"><pre class="highlight"><code>"Policies": {
    "AppCookieStickinessPolicies": [],
    "LBCookieStickinessPolicies": [],
    "OtherPolicies": [
      "traefik-ProxyProtocol-policy"
    ]
},
...
</code></pre></div></div>

<p>Now look for the correct port:</p>

<div class="language-plaintext highlighter-rouge"><div class="highlight"><pre class="highlight"><code>aws elb describe-load-balancers --load-balancer-name name-of-the-balancer --region eu-central-1 | grep 443 -A 5 -B 5 
</code></pre></div></div>

<p>Result:</p>

<div class="language-plaintext highlighter-rouge"><div class="highlight"><pre class="highlight"><code>...
"Listener": {
    "Protocol": "TCP",
    "LoadBalancerPort": 443,
    "InstanceProtocol": "TCP",
    "InstancePort": 31533
},
...
</code></pre></div></div>

<p>Then you have to add the policy to the port 31533:</p>

<div class="language-plaintext highlighter-rouge"><div class="highlight"><pre class="highlight"><code>aws elb set-load-balancer-policies-for-backend-server --load-balancer-name name-of-the-balancer --instance-port 31533 --policy-names traefik-ProxyProtocol-policy --region eu-central-1
</code></pre></div></div>

<p>Review if the policy was added:</p>

<div class="language-plaintext highlighter-rouge"><div class="highlight"><pre class="highlight"><code>aws elb describe-load-balancers --load-balancer-name name-of-the-balancer --region eu-central-1 | grep -R BackendServerDescriptions -A 7
</code></pre></div></div>
<p>Result:</p>

<div class="language-plaintext highlighter-rouge"><div class="highlight"><pre class="highlight"><code>"BackendServerDescriptions": [
  {
    "InstancePort": 31533,
    "PolicyNames": [
        "traefik-ProxyProtocol-policy"
    ]
  }
],
</code></pre></div></div>

<p>SECOND: Add a special configuration to <a href="https://doc.traefik.io/traefik/">Traefik</a> to be ready for the <a href="https://www.haproxy.org/download/2.0/doc/proxy-protocol.txt">Proxy protocol</a>. More info <a href="https://doc.traefik.io/traefik/routing/entrypoints/">here</a>.</p>

<p>Find into the Load Balancer description the <a href="https://en.wikipedia.org/wiki/Classless_Inter-Domain_Routing">CIDR</a> networks:</p>

<p><img src="/attachments/subnet-cidr.png" alt="subnet-cidr" title="Subnet CDIR" /></p>

<p>This is the configuration in YAML:</p>

<div class="language-plaintext highlighter-rouge"><div class="highlight"><pre class="highlight"><code>## Static configuration
entryPoints:
  websecure:
    address: ":443"
    proxyProtocol:
      trustedIPs:
        - "10.1.4.0/24"
        - "10.1.5.0/24"
        - "10.1.6.0/24"
</code></pre></div></div>

<p>For the CLI:</p>

<div class="language-plaintext highlighter-rouge"><div class="highlight"><pre class="highlight"><code>--entryPoints.websecure.address=:443
--entryPoints.websecure.proxyProtocol.trustedIPs=10.1.4.0/24,10.1.5.0/24,10.1.6.0/24
</code></pre></div></div>

<p>Note: if you want to now the ranges use <a href="https://www.ipaddressguide.com/cidr">ipaddressguide</a></p>

<p>Ok. If now we do the curl …</p>

<div class="language-plaintext highlighter-rouge"><div class="highlight"><pre class="highlight"><code>curl -i https://yourdomain.com
...
X-Forwarded-For: 93.22.110.23
X-Forwarded-Host: yourdomain.com
X-Forwarded-Port: 443
X-Forwarded-Proto: https
X-Forwarded-Server: traefik-55c96f54d6-7cmfn
X-Real-Ip: 93.22.110.23
...
</code></pre></div></div>

<p>You got the REAL IP!</p>]]></content><author><name>Moncho Pena</name></author><category term="devops" /><summary type="html"><![CDATA[The environment: K8s + Amazon ELB + Traefik.]]></summary></entry><entry><title type="html">Your own hosting like a boss (4 of 5)</title><link href="https://moncho.cloud/hosting/portainer/docker/gitlab/actions/2021/06/13/your-own-hosting-like-a-boss-4-of-5.html" rel="alternate" type="text/html" title="Your own hosting like a boss (4 of 5)" /><published>2021-06-13T17:00:00-05:00</published><updated>2021-06-13T17:00:00-05:00</updated><id>https://moncho.cloud/hosting/portainer/docker/gitlab/actions/2021/06/13/your-own-hosting-like-a-boss-4-of-5</id><content type="html" xml:base="https://moncho.cloud/hosting/portainer/docker/gitlab/actions/2021/06/13/your-own-hosting-like-a-boss-4-of-5.html"><![CDATA[<p>We are going to use the <a href="https://github.com/monchopena/bdunk">repository of this webpage</a> and <a href="https://github.com/features/actions">GitHub Actions</a>.</p>

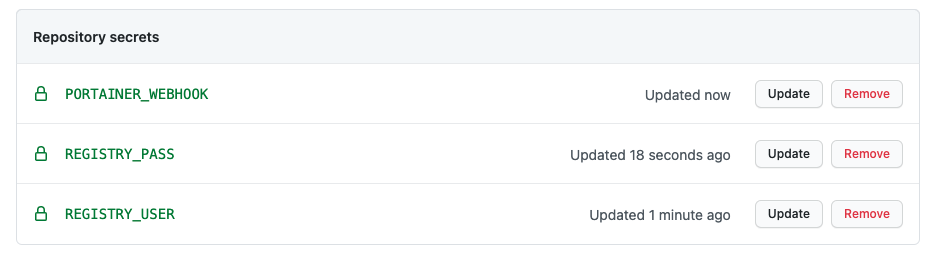
<p>First we need to create 3 repository secrets:</p>

<ul>
  <li>REGISTRY_USER: the registry user</li>
  <li>REGISTRY_PASS: the password for registry</li>
  <li>PORTAINER_WEBHOOK: sample https://portainer.contabo.bdunk.com/api/webhooks/xxxxxxxx-xxxx-xxxx-xxxx-xxxxxxxxxxxx</li>
</ul>

<p><img src="/attachments/environment-secrets.png" alt="environment-secrets" title="Environment secrets" /></p>

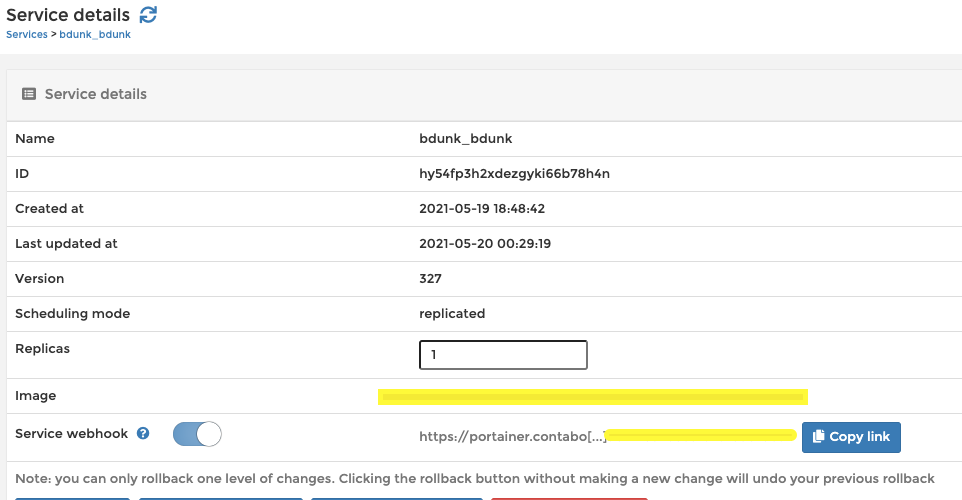
<p>You can get this webhook from the button “Copy Link” (Remember you have to activate the webhook):</p>

<p><img src="/attachments/service-webhook.png" alt="service-webhook" title="Service Webhook" /></p>

<p>Create a new file for the Actions Definition <a href="https://github.com/monchopena/bdunk/blob/master/.github/workflows/jekyll.yml">like this</a>.</p>

<div class="language-plaintext highlighter-rouge"><div class="highlight"><pre class="highlight"><code>name: Testing the Actions with Jekyll

on:
  push:
    branches: [ master ]

jobs:
  publish:

    runs-on: ubuntu-latest

    steps:
    - uses: actions/checkout@v2
    - name: Build the site in the jekyll/builder container
      run: |
        docker run \
        -v ${{ github.workspace }}:/srv/jekyll -v ${{ github.workspace }}/_site:/srv/jekyll/_site \
        jekyll/builder:latest /bin/bash -c "chmod -R 777 /srv/jekyll &amp;&amp; jekyll build --future"
    
    - name: Set up QEMU
      uses: docker/setup-qemu-action@v1
    
    - name: Set up Docker Buildx
      uses: docker/setup-buildx-action@v1
    
    - name: Login to your own Registry
      uses: docker/login-action@v1 
      with:
        registry: registry.yourdomain.com
        username: ${{ secrets.REGISTRY_USER }}
        password: ${{ secrets.REGISTRY_PASS }}

    - name: Build and push
      id: docker_build
      uses: docker/build-push-action@v2
      with:
        push: true
        context: .
        tags: registry.yourdomain.com/moncho/bdunk-web:latest
    
    - name: Image digest
      run: echo ${{ steps.docker_build.outputs.digest }}
    
    - name: curl
      uses: wei/curl@v1
      with:
        args: -X POST ${{ secrets.PORTAINER_WEBHOOK }}
</code></pre></div></div>

<p>When the action is going to be called, in this case when we make a push to master.</p>

<div class="language-plaintext highlighter-rouge"><div class="highlight"><pre class="highlight"><code>on:
  push:
    branches: [ master ]
</code></pre></div></div>

<p>We generate all the necessary files and save into _site foder.</p>

<div class="language-plaintext highlighter-rouge"><div class="highlight"><pre class="highlight"><code>Build the site in the jekyll/builder container
</code></pre></div></div>

<p>Login againsts our own Registry.</p>

<div class="language-plaintext highlighter-rouge"><div class="highlight"><pre class="highlight"><code>registry: registry.yourdomain.com
</code></pre></div></div>

<p>Pushing the image. In this step is very important to write the correct context.</p>

<div class="language-plaintext highlighter-rouge"><div class="highlight"><pre class="highlight"><code>with:
        push: true
        context: .
        tags: registry.yourdomain.com/moncho/bdunk-web:latest
</code></pre></div></div>

<p>And finally we do a call to the Portainer webhook, so it’s going to get the latest image and pull it … Awesome!. <a href="https://documentation.portainer.io/v2.0/webhooks/create/">More info about this</a>.</p>

<div class="language-plaintext highlighter-rouge"><div class="highlight"><pre class="highlight"><code>args: -X POST ${{ secrets.PORTAINER_WEBHOOK }}
</code></pre></div></div>

<p>Next post we are going to make a complete sample with a complex webpage.</p>]]></content><author><name>Moncho Pena</name></author><category term="hosting" /><category term="portainer" /><category term="docker" /><category term="gitlab" /><category term="actions" /><summary type="html"><![CDATA[We are going to use the repository of this webpage and GitHub Actions.]]></summary></entry><entry><title type="html">Your own hosting like a boss (3 of 5)</title><link href="https://moncho.cloud/hosting/portainer/docker/2021/05/25/your-own-hosting-like-a-boss-3-of-5.html" rel="alternate" type="text/html" title="Your own hosting like a boss (3 of 5)" /><published>2021-05-25T17:00:00-05:00</published><updated>2021-05-25T17:00:00-05:00</updated><id>https://moncho.cloud/hosting/portainer/docker/2021/05/25/your-own-hosting-like-a-boss-3-of-5</id><content type="html" xml:base="https://moncho.cloud/hosting/portainer/docker/2021/05/25/your-own-hosting-like-a-boss-3-of-5.html"><![CDATA[<p>I’m going to need docker images and I don’t want to use a public repository.</p>

<p>There’s a Official repo called <a href="https://hub.docker.com/_/registry">registry</a>, now we can create our own image store.</p>

<p>Let’s create a new stack!</p>

<p>First we need to create the network:</p>

<div class="language-plaintext highlighter-rouge"><div class="highlight"><pre class="highlight"><code>docker network create registry_network --scope swarm
</code></pre></div></div>

<p>And we need a file to save the Basic Auth. Remember this user and password</p>

<div class="language-plaintext highlighter-rouge"><div class="highlight"><pre class="highlight"><code>mkdir -p registry/auth &amp;&amp; mkdir -p registry/data
echo $(htpasswd -nb user password) | sed -e s/\\$/\\$\\$/g &gt; registry/auth/registry.password
</code></pre></div></div>

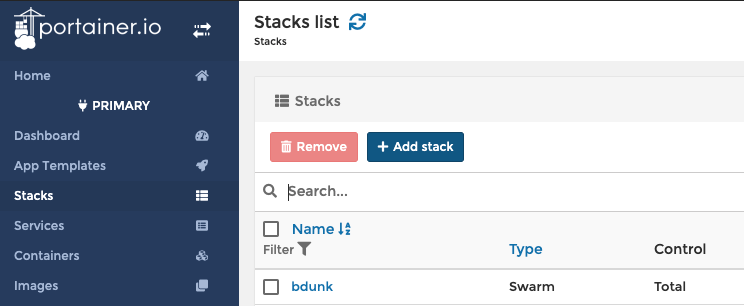
<p>Into Portainer go to Stacks and press “+ Add stack”.</p>

<p><img src="/attachments/portainer-stack.png" alt="portainer stack" title="Portainer Add Stack" /></p>

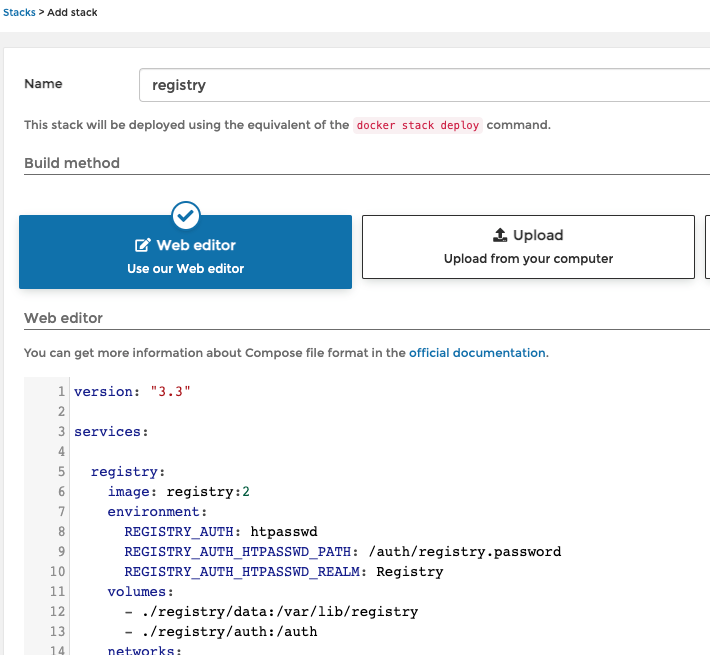
<p>Choose a name and paste this configuration:</p>

<div class="language-plaintext highlighter-rouge"><div class="highlight"><pre class="highlight"><code>version: "3.3"

services:

  registry:
    image: registry:2
    environment:
      REGISTRY_AUTH: htpasswd
      REGISTRY_AUTH_HTPASSWD_PATH: /auth/registry.password
      REGISTRY_AUTH_HTPASSWD_REALM: Registry
    volumes:
      - ./registry/data:/var/lib/registry
      - ./registry/auth:/auth
    networks:
      - registry_network
      - portainer_default
    labels:
      - "traefik.enable=true"
      - "traefik.docker.network=portainer_default"
      - "traefik.http.routers.registry.rule=(Host(`registry.yourdomain.com`))"
      - "traefik.http.routers.registry.entrypoints=websecure"
      - "traefik.http.services.registry.loadbalancer.server.port=5000"
      - "traefik.http.services.registry.loadBalancer.sticky.cookie=true"
      - "traefik.http.routers.registry.service=registry"
      - "traefik.http.routers.registry.tls=true"
      - "traefik.http.routers.registry.tls.certresolver=leresolver"

networks:
  portainer_default:
    external: true
  registry_network:
    external: true
</code></pre></div></div>

<p><img src="/attachments/portainer-stack-paste.png" alt="portainer add stack" title="Portainer Stack Paste" /></p>

<p>Press deploy button and wait some seconds ⧖.</p>

<p>If everythig gone well you should login.</p>

<div class="language-plaintext highlighter-rouge"><div class="highlight"><pre class="highlight"><code># docker login -u user -p password registry.contabo.bdunk.com
Login Succeeded
</code></pre></div></div>

<p><a href="https://github.com/monchopena/your-own-hosting-like-a-boss-files/tree/main/nginx-sample">here</a> you can find a very simple sample to make a image.</p>

<p>Building the image:</p>

<div class="language-plaintext highlighter-rouge"><div class="highlight"><pre class="highlight"><code>docker build .
</code></pre></div></div>

<p>Listing the images with <code class="language-plaintext highlighter-rouge">docker images</code>`</p>
<div class="language-plaintext highlighter-rouge"><div class="highlight"><pre class="highlight"><code>REPOSITORY   TAG             IMAGE ID       CREATED         SIZE
&lt;none&gt;       &lt;none&gt;          60081ed32117   5 minutes ago   133MB
</code></pre></div></div>

<p>A quick test for the image:</p>

<div class="language-plaintext highlighter-rouge"><div class="highlight"><pre class="highlight"><code>docker run -p 8888:80 60081ed32117 
</code></pre></div></div>

<p>Making a curl:</p>

<div class="language-plaintext highlighter-rouge"><div class="highlight"><pre class="highlight"><code># curl localhost:8888
hello conch
</code></pre></div></div>

<p>Creating a tag for the image:</p>

<div class="language-plaintext highlighter-rouge"><div class="highlight"><pre class="highlight"><code>docker image tag 60081ed32117 registry.yourdomain.com/your-username/nginx-test:latest
</code></pre></div></div>

<p>And then push 🚀</p>

<div class="language-plaintext highlighter-rouge"><div class="highlight"><pre class="highlight"><code># docker push registry.yourdomain.com/your-username/nginx-test
The push refers to repository [registry.yourdomain.com/moncho/nginx-test]
0b411e19d514: Pushed 
1914a564711c: Mounted from your-username/nginx-test 
db765d5bf9f8: Mounted from your-username/nginx-test 
903ae422d007: Mounted from your-username/nginx-test 
66f88fdd699b: Mounted from your-username/nginx-test 
2ba086d0a00c: Mounted from your-username/nginx-test 
346fddbbb0ff: Mounted from your-username/nginx-test 
latest: digest: sha256:e7e7ff0a82e1a97630e9b40377c1e97fadad09072789f9b4ce4e664bcef50671 size: 1777
</code></pre></div></div>

<p>Yes! The image is now into the repository. Good Job!</p>

<p>Next part is about how to make auto deploys.</p>

<p>See you soon in part 4.</p>]]></content><author><name>Moncho Pena</name></author><category term="hosting" /><category term="portainer" /><category term="docker" /><summary type="html"><![CDATA[I’m going to need docker images and I don’t want to use a public repository.]]></summary></entry><entry><title type="html">Your own hosting like a boss (2 of 5)</title><link href="https://moncho.cloud/hosting/portainer/docker/2021/05/23/your-own-hosting-like-a-boss-2-of-5.html" rel="alternate" type="text/html" title="Your own hosting like a boss (2 of 5)" /><published>2021-05-23T17:00:00-05:00</published><updated>2021-05-23T17:00:00-05:00</updated><id>https://moncho.cloud/hosting/portainer/docker/2021/05/23/your-own-hosting-like-a-boss-2-of-5</id><content type="html" xml:base="https://moncho.cloud/hosting/portainer/docker/2021/05/23/your-own-hosting-like-a-boss-2-of-5.html"><![CDATA[<p>Good news for you: If you have docker you can start to work with <a href="https://docs.docker.com/engine/swarm/">Docker Swarm</a>.</p>

<p>With this arquitecture you have these incredible features:</p>
<ul>
  <li>Create a number of replicas</li>
  <li>You can create new servers and add to the swarm as workers</li>
</ul>

<p>The first step is start with this command:</p>

<div class="language-plaintext highlighter-rouge"><div class="highlight"><pre class="highlight"><code>docker swarm init
</code></pre></div></div>

<p>In Digital Ocean you got this error:</p>

<div class="language-plaintext highlighter-rouge"><div class="highlight"><pre class="highlight"><code>Error response from daemon: could not choose an IP address to advertise since this system has multiple addresses on interface eth0 (206.81.24.179 and 10.19.0.6) - specify one with --advertise-addr
</code></pre></div></div>

<p>Choose the external IP:</p>

<div class="language-plaintext highlighter-rouge"><div class="highlight"><pre class="highlight"><code>docker swarm init --advertise-addr 206.81.24.179
</code></pre></div></div>

<p>If everything is Ok. You will read:</p>

<div class="language-plaintext highlighter-rouge"><div class="highlight"><pre class="highlight"><code>Swarm initialized: current node (cyjmwjxm4ivlvh6pbdruospgj) is now a manager.

To add a worker to this swarm, run the following command:

    docker swarm join --token ADD_HERE_YOUR_TOKEN 206.81.24.179:2377

To add a manager to this swarm, run 'docker swarm join-token manager' and follow the instructions.
</code></pre></div></div>

<p>As I commnented at the begining you can add new servers with the command join. No worries if you don’t save or remember the token, you can access at any momment with this command:</p>

<div class="language-plaintext highlighter-rouge"><div class="highlight"><pre class="highlight"><code>docker swarm join-token worker
</code></pre></div></div>

<p>Check the network created.</p>

<div class="language-plaintext highlighter-rouge"><div class="highlight"><pre class="highlight"><code># docker network ls
NETWORK ID     NAME              DRIVER    SCOPE
1cf3640c4dae   bridge            bridge    local
8a937e6a0cb9   docker_gwbridge   bridge    local
b95fa8892056   host              host      local
mf24yxxrpofp   ingress           overlay   swarm
3f7807925072   none              null      local
</code></pre></div></div>

<p>We choose <a href="https://www.portainer.io/">Portainer</a> because is a good idea to have a UI for the control of your server.</p>

<p>This is the stack file you can find <a href="https://github.com/monchopena/your-own-hosting-like-a-boss-files/blob/main/portainer/stack.yaml">here</a>. Read the comments to understand how it works.</p>

<div class="language-plaintext highlighter-rouge"><div class="highlight"><pre class="highlight"><code>version: "3.3"

services:
  traefik:
    image: "traefik:latest"
    command:
      # We want the dashboard of traefik active
      - --api.dashboard=true
      - --api.insecure=true
      - --entrypoints.web.address=:80
      - --entrypoints.websecure.address=:443
      - --providers.docker
      # Change this if you want more logs (DEBUG level could be too much)
      - --log.level=ERROR
      - --certificatesresolvers.leresolver.acme.tlschallenge=true
      - --certificatesresolvers.leresolver.acme.httpchallenge=true
      - --certificatesresolvers.leresolver.acme.email=your_email@here.com
      # To save the certs is hight recommended to use a volume as you can see it bellow
      - --certificatesresolvers.leresolver.acme.storage=./acme.json
      - --certificatesresolvers.leresolver.acme.httpchallenge.entrypoint=web
    ports:
      - "80:80"
      - "443:443"
    volumes:
      - "/var/run/docker.sock:/var/run/docker.sock:ro"
      # In the same folder you have this file
      # mkdir traefik &amp;&amp; touch traefik/acme.json &amp;&amp; chmod 400 traefik/acme.json
      - "./traefik/acme.json:/acme.json"
    labels:
      - "traefik.enable=true"
      # Redirect all traffic from http to https
      - "traefik.http.routers.http-catchall.rule=hostregexp(`{host:.+}`)"
      - "traefik.http.routers.http-catchall.entrypoints=web"
      - "traefik.http.routers.http-catchall.middlewares=redirect-to-https"
      - "traefik.http.middlewares.redirect-to-https.redirectscheme.scheme=https"
      - "traefik.http.middlewares.redirect-to-https.redirectscheme.permanent=true"

      # Middleware
      # admin-auth middleware with HTTP Basic auth
      # Using the environment variables USERNAME and HASHED_PASSWORD
      # Sample echo $(htpasswd -nB user) | sed -e s/\\$/\\$\\$/g
      # In this case the password is password: Don't use this in production 😁
      - "traefik.http.middlewares.admin-auth.basicauth.users=user:$$2y$$05$$0et0ONr1P6o3Fh2f/6h6G.sRNu740FOSTg.zXwA87Gq/VSvTOj2oW"

      # Dashboard
      # Remember to point to the Docker Swarm IP server
      - "traefik.http.routers.traefik-public.rule=Host(`traefik.yourdomain.com`)"
      - "traefik.http.routers.traefik-public.entrypoints=websecure"
      - "traefik.http.routers.traefik-public.middlewares=admin-auth"
      - "traefik.http.services.traefik-public.loadbalancer.server.port=8080"
      - "traefik.http.routers.traefik-public.service=api@internal"
      - "traefik.http.routers.traefik-public.tls.certresolver=leresolver"

  portainer:
    image: portainer/portainer-ce:latest
    command: -H unix:///var/run/docker.sock
    volumes:
      - /var/run/docker.sock:/var/run/docker.sock
      - portainer_data:/data
    deploy:
      mode: replicated
      replicas: 1
      placement:
        constraints: [node.role == manager]
    labels:
      - "traefik.enable=true"
      # Frontend
      # Remember to point to the Docker Swarm IP server
      - "traefik.http.routers.frontend.rule=Host(`portainer.yourdomain.com`)"
      - "traefik.http.routers.frontend.entrypoints=websecure"
      - "traefik.http.services.frontend.loadbalancer.server.port=9000"
      - "traefik.http.routers.frontend.service=frontend"
      - "traefik.http.routers.frontend.tls.certresolver=leresolver"

volumes:
  portainer_data:
</code></pre></div></div>

<p>With <a href="https://doc.traefik.io/traefik/">Traefik</a> you resolve the problem with certs. One tip: review if the domains point to the server before launch the stack.</p>

<div class="language-plaintext highlighter-rouge"><div class="highlight"><pre class="highlight"><code>host -t A portainer.yourdomain.com
...
</code></pre></div></div>

<p>Deploy this stack 🚀</p>

<div class="language-plaintext highlighter-rouge"><div class="highlight"><pre class="highlight"><code># docker stack deploy -c portainer.yaml portainer
Creating network portainer_default
Creating service portainer_traefik
Creating service portainer_portainer
</code></pre></div></div>

<p>Take a look to containers with <code class="language-plaintext highlighter-rouge">docker ps -a</code>.</p>

<div class="language-plaintext highlighter-rouge"><div class="highlight"><pre class="highlight"><code>CONTAINER ID   IMAGE                           COMMAND                  CREATED          STATUS          PORTS                NAMES
0dbf02813006   traefik:latest                  "/entrypoint.sh --ap…"   34 seconds ago   Up 28 seconds   80/tcp               portainer_traefik.1.7777idunbforuu53enwi47qhr
02e7c7ff96b1   portainer/portainer-ce:latest   "/portainer -H unix:…"   2 minutes ago    Up 2 minutes    8000/tcp, 9000/tcp   portainer_portainer.1.e69yugombuxs6cb9gqgcr1q8d
</code></pre></div></div>

<p>Watch logs of the container:</p>

<div class="language-plaintext highlighter-rouge"><div class="highlight"><pre class="highlight"><code>docker logs -f 0dbf02813006
time="2021-05-24T17:02:09Z" level=info msg="Configuration loaded from flags."
</code></pre></div></div>

<p>No erros good news!</p>

<p>Go to the Traefik dasboard (traefik.yourdomain.com) and use the user and password for Basic Auth.</p>

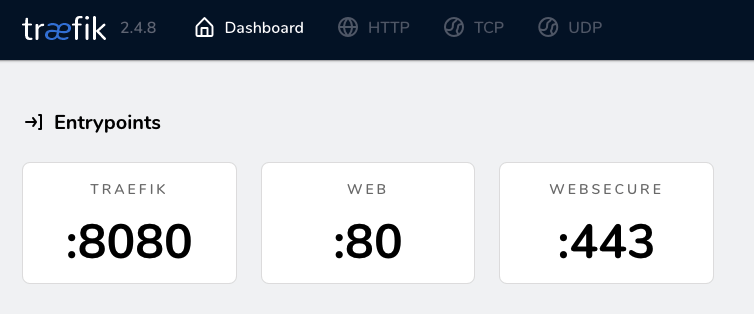
<p><img src="/attachments/traefik-dashboard.png" alt="traefik dashboard" title="Traefik Dashboard" /></p>

<p>The first time you go to Portainer Admin you have to choose user and password.</p>

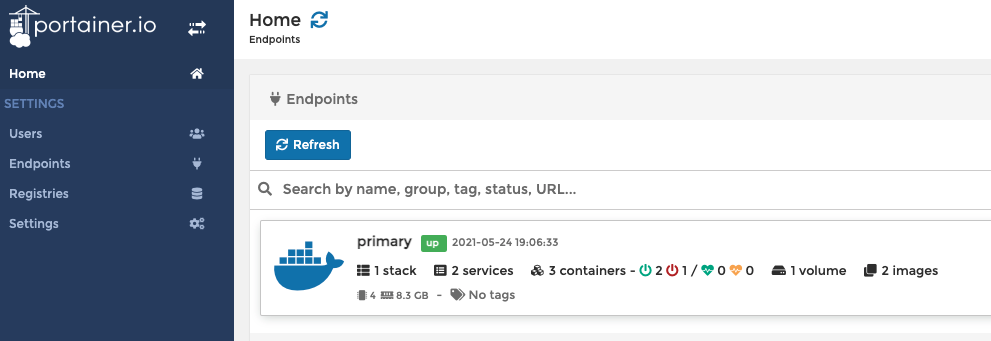
<p><img src="/attachments/portainer-dashboard.png" alt="portainer dashboard" title="Portainer Dashboard" /></p>

<p>In this moment you passed the most difficult part, now you have the base to create other stacks.</p>

<p>Next part is about how to create your own <a href="https://hub.docker.com/_/registry">registry</a>.</p>

<p>See you soon in part 3.</p>]]></content><author><name>Moncho Pena</name></author><category term="hosting" /><category term="portainer" /><category term="docker" /><summary type="html"><![CDATA[Good news for you: If you have docker you can start to work with Docker Swarm.]]></summary></entry><entry><title type="html">Your own hosting like a boss (1 of 5)</title><link href="https://moncho.cloud/hosting/portainer/docker/2021/05/18/your-own-hosting-like-a-boss-1-of-5.html" rel="alternate" type="text/html" title="Your own hosting like a boss (1 of 5)" /><published>2021-05-18T17:00:00-05:00</published><updated>2021-05-18T17:00:00-05:00</updated><id>https://moncho.cloud/hosting/portainer/docker/2021/05/18/your-own-hosting-like-a-boss-1-of-5</id><content type="html" xml:base="https://moncho.cloud/hosting/portainer/docker/2021/05/18/your-own-hosting-like-a-boss-1-of-5.html"><![CDATA[<p>This is the first post long time ago. A lot of things passed in my live, one of them: I dedicated a lot of time to learn and apply <a href="https://en.wikipedia.org/wiki/DevOps">DevOps</a> knowledge.</p>

<p>In these serie of posts (first of fifth) I want to reach these conditions:</p>

<ul>
  <li>I want to create a server with a script, for this I’m going to use <a href="https://www.terraform.io/">Terraform</a>.</li>
  <li>I would like to have the possiblity of scale. I choosed <a href="https://docs.docker.com/engine/swarm/">Docker Swarm</a>.</li>
  <li>I need my own <a href="https://hub.docker.com/_/registry">registry</a> server for my images.</li>
  <li>It’s mandatory to use SSL certificates and I know <a href="https://doc.traefik.io/traefik/">Traefik</a> works fantastic with <a href="https://letsencrypt.org">Let’s encrypt</a>.</li>
  <li>I expect to deploy in a easy way and <a href="https://www.portainer.io/">Portainer</a> has a good system to do it with a <a href="https://documentation.portainer.io/v2.0/webhooks/create/">webhook</a>.</li>
</ul>

<p>First of all you can find the files used in this article <a href="https://github.com/monchopena/your-own-hosting-like-a-boss-files/tree/main/terraform">here</a>.</p>

<p><a href="https://learn.hashicorp.com/tutorials/terraform/install-cli">How to install Terraform</a>.</p>

<p>Let’s take a 👀 to the <a href="https://github.com/monchopena/your-own-hosting-like-a-boss-files/blob/main/terraform/digital-ocean/docker-machine-create/main.tf">main file</a>.</p>

<p>I’m using DO but you could do it with other provider.</p>

<div class="language-plaintext highlighter-rouge"><div class="highlight"><pre class="highlight"><code>provider "digitalocean" {
  token = var.do_token
}
</code></pre></div></div>

<p>This token is defined as a variable into the <a href="https://github.com/monchopena/your-own-hosting-like-a-boss-files/blob/main/terraform/digital-ocean/docker-machine-create/variables.tf">vars file</a></p>

<div class="language-plaintext highlighter-rouge"><div class="highlight"><pre class="highlight"><code>variable "do_token" {
    description = "The token"
}
</code></pre></div></div>

<p>If you don’t define a “default value” you will asked for the value when you try to apply the script.</p>

<p>Here the type of the droplet:</p>

<div class="language-plaintext highlighter-rouge"><div class="highlight"><pre class="highlight"><code>resource "digitalocean_droplet" "docker_swarm" {
  image  = "ubuntu-20-10-x64"
  name   = "docker-swarm"
  region = "fra1"
  size   = "s-4vcpu-8gb"
  ssh_keys = [ "123123" ]
  user_data = file("userdata.yaml")
}
</code></pre></div></div>

<p>I choosed Ubuntu as server.</p>

<p>How to know your ssh_key id:</p>

<div class="language-plaintext highlighter-rouge"><div class="highlight"><pre class="highlight"><code>curl -X GET -H "Content-Type: application/json" -H "Authorization: Bearer here_your_token" "https://api.digitalocean.com/v2/account/keys" 
</code></pre></div></div>

<p>At the begining of the respose you have the id:</p>

<div class="language-plaintext highlighter-rouge"><div class="highlight"><pre class="highlight"><code>{"ssh_keys":[{"id":123123,"fingerprint ...
</code></pre></div></div>

<p>May be you have some question about this file <a href="https://github.com/monchopena/your-own-hosting-like-a-boss-files/blob/main/terraform/digital-ocean/docker-machine-create/userdata.yaml">userdata.yaml</a>. This is like a script to deploy after the machine is created. More info in <a href="https://github.com/canonical/cloud-init">this repo</a>. If you want to know more deeply <a href="https://cloudinit.readthedocs.io/en/latest/topics/examples.html">here some samples of configuration files</a>.</p>

<p>In my case I only want to install docker dependencies:</p>

<div class="language-plaintext highlighter-rouge"><div class="highlight"><pre class="highlight"><code>#cloud-config
package_update: true
packages:
  - docker.io
  - docker-compose
  - vim
  - htop
</code></pre></div></div>

<p>I use the DO DNSs so I can update with the IP assigned easily.</p>

<div class="language-plaintext highlighter-rouge"><div class="highlight"><pre class="highlight"><code>resource "digitalocean_record" "edge" {
  domain = var.domain
  type   = "A"
  name   = "traefik"
  ttl    = "300"
  value  = digitalocean_droplet.docker_swarm.ipv4_address
}
</code></pre></div></div>

<p>Let’s launch the terraform:</p>

<pre><code class="language-`">terraform init
terraform validate
terraform plan
terraform apply
</code></pre>

<p>You need to paste the token:</p>

<div class="language-plaintext highlighter-rouge"><div class="highlight"><pre class="highlight"><code>$ terraform apply
var.do_token
  The token

  Enter a value: 
</code></pre></div></div>

<p>After 1-2 minutes …</p>

<div class="language-plaintext highlighter-rouge"><div class="highlight"><pre class="highlight"><code>Apply complete! Resources: 3 added, 0 changed, 0 destroyed.

Outputs:

connect_ssh = "ssh root@46.101.204.107"
</code></pre></div></div>

<p>The output is because we define into <a href="https://github.com/monchopena/your-own-hosting-like-a-boss-files/blob/main/terraform/digital-ocean/docker-machine-create/main.tf">main file</a>:</p>

<div class="language-plaintext highlighter-rouge"><div class="highlight"><pre class="highlight"><code>output "connect_ssh" {
  description = "How to connect to the New Server"
  value = "ssh root@${digitalocean_droplet.docker_swarm.ipv4_address}"
}
</code></pre></div></div>

<p>The Droplet:</p>

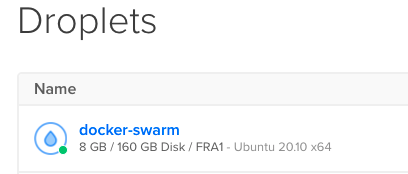
<p><img src="/attachments/droplets.png" alt="droplet photo" title="Droplet Create Success" /></p>

<p>And if we connect with the server with ssh:</p>

<div class="language-plaintext highlighter-rouge"><div class="highlight"><pre class="highlight"><code>root@docker-swarm:~# docker  ps -a
CONTAINER ID   IMAGE     COMMAND   CREATED   STATUS    PORTS     NAMES
</code></pre></div></div>

<p>Well done! We have the base to start with the <a href="https://docs.docker.com/engine/swarm/">Docker Swarm</a>.</p>

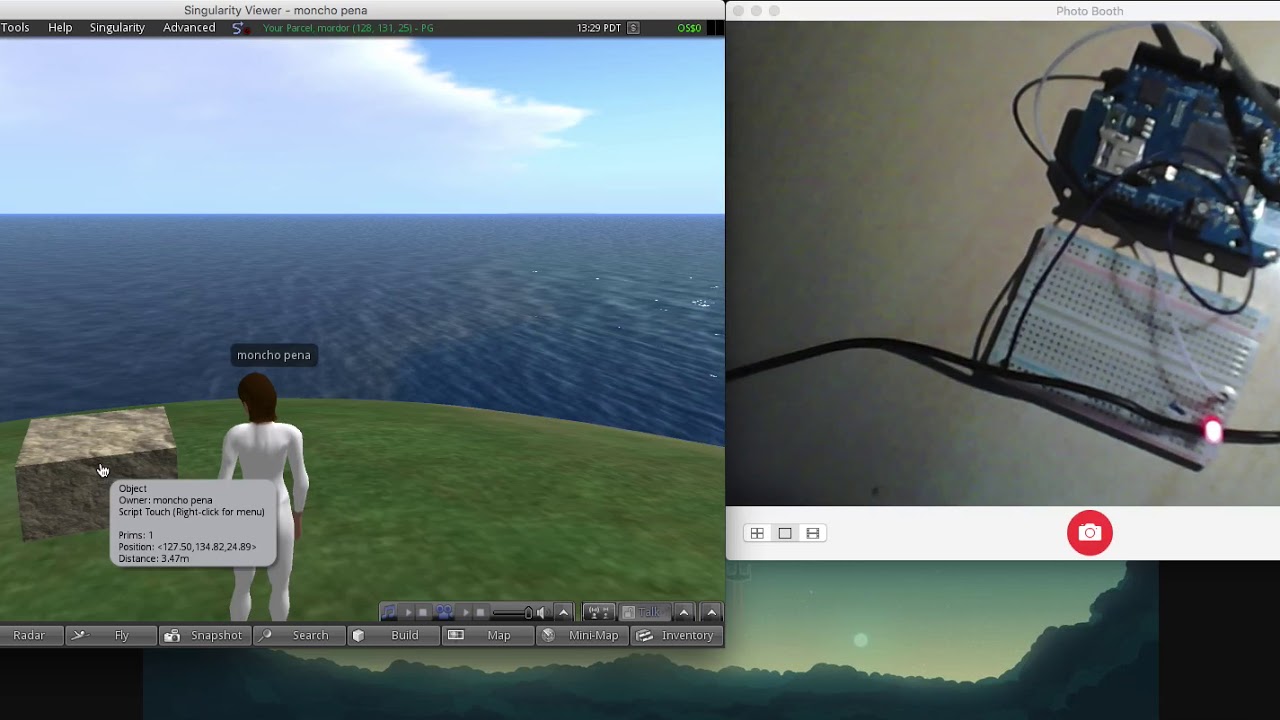
<p>See you soon in part 2.</p>]]></content><author><name>Moncho Pena</name></author><category term="hosting" /><category term="portainer" /><category term="docker" /><summary type="html"><![CDATA[This is the first post long time ago. A lot of things passed in my live, one of them: I dedicated a lot of time to learn and apply DevOps knowledge.]]></summary></entry><entry><title type="html">Switch a LED on from OpenSim</title><link href="https://moncho.cloud/arduino/2018/05/22/switch-a-led-on-from-opensim.html" rel="alternate" type="text/html" title="Switch a LED on from OpenSim" /><published>2018-05-22T17:00:00-05:00</published><updated>2018-05-22T17:00:00-05:00</updated><id>https://moncho.cloud/arduino/2018/05/22/switch-a-led-on-from-opensim</id><content type="html" xml:base="https://moncho.cloud/arduino/2018/05/22/switch-a-led-on-from-opensim.html"><![CDATA[<p>Three years ago I published this video:</p>

<p><a href="https://www.youtube.com/watch?v=jBbb-RDDzes"><img src="/attachments/youtube_opensim_video.jpg" alt="youtube_opensim_video" title="Youtube capture OpenSim Video" /></a></p>

<p>And some people asked to me for a 'How to' … and well … here we go!</p>

<h1 id="arduino-part">Arduino part</h1>

<p>We need a Arduino. In this case I’m using a <a href="https://store.arduino.cc/arduino-wifi-shield">Arduino Wifi Shield</a>.</p>

<p><a href="https://gist.github.com/monchopena/71e1918481a52ad8fbce9f796d33107b#file-wifi_web_server">This is all the code you will need</a>.</p>

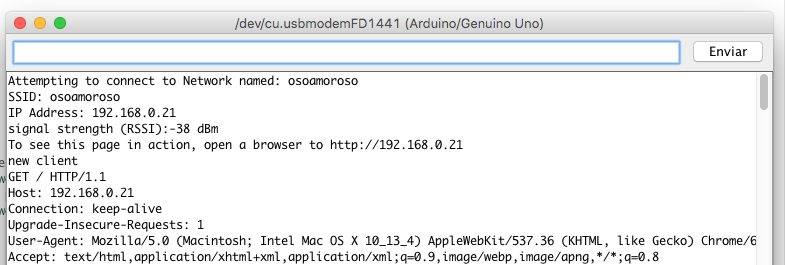
<p>With te Serial Monitor of the Arduino you can see if you are connected to the Wifi and what is your IP.</p>

<p><img src="/attachments/arduino_monitor.png" alt="arduino_monitor" title="Arduino Monitor" /></p>

<p>You can test if everything is working fine with curl</p>

<div class="language-plaintext highlighter-rouge"><div class="highlight"><pre class="highlight"><code># Low the LED
curl http://192.168.0.21/L

# Hight the LED
curl http://192.168.0.21/H
</code></pre></div></div>

<h1 id="opensim-part">OpenSim part</h1>

<p>How to install:</p>

<div class="language-plaintext highlighter-rouge"><div class="highlight"><pre class="highlight"><code>wget http://opensimulator.org/dist/opensim-0.9.0.0.tar.gz
cd opensim-0.9.0.0/bin
</code></pre></div></div>

<p>Then if you try to start opensim you will recieve this warning:</p>

<div class="language-plaintext highlighter-rouge"><div class="highlight"><pre class="highlight"><code>./opensim.sh: 5: ./opensim.sh: mono: not found
</code></pre></div></div>

<p>Let’s install Mono dependencies:</p>

<div class="language-plaintext highlighter-rouge"><div class="highlight"><pre class="highlight"><code>apt-get install mono-complete
</code></pre></div></div>

<p>And start again with:</p>

<div class="language-plaintext highlighter-rouge"><div class="highlight"><pre class="highlight"><code>./opensim.sh
</code></pre></div></div>

<p>First question is about region.</p>

<p>Create a user with the command '<em>create user</em>'.</p>

<p><em>IMPORTANT</em>: If you fill First with '<em>moncho</em>' and Last with '<em>pena</em>' your user id will be '<em>moncho pena</em>'.</p>

<h1 id="singularity">Singularity</h1>

<p>You can use another 'Second Life' Client but in this sample I’m using <a href="http://www.singularityviewer.org/downloads">Singularity</a>.</p>

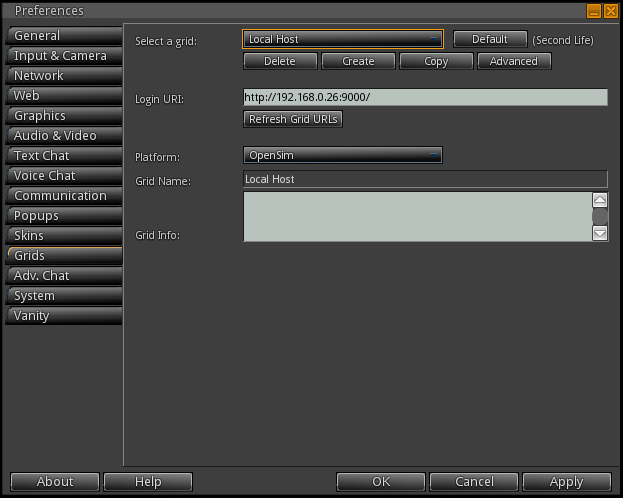
<p>Thiis is the configuration of the grid.</p>

<p><img src="/attachments/singularity_config_grid.png" alt="singularity_config" title="Singularity Config Grid" /></p>

<p>How to login:</p>

<p><img src="/attachments/singularity_login.png" alt="singularity_login" title="Singularity Login" /></p>

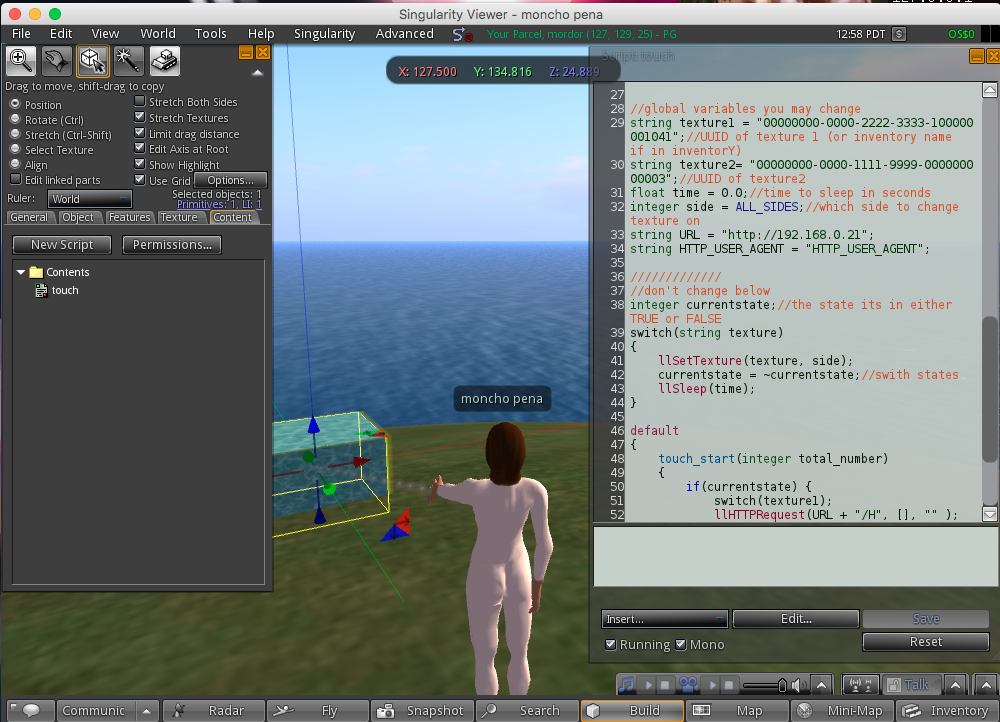
<p>Ok. You are in a virtual world an you now are like a god. Create a new object. Then select, click on the tab Content and New Script.</p>

<p><img src="/attachments/singularity_script.png" alt="singularity_script" title="Singularity Script" /></p>

<p>This is the code where we are calling the “webhook” of the Arduino. We change the texture of the object everytime we touch it and we do the call to switch the led.</p>

<div class="language-plaintext highlighter-rouge"><div class="highlight"><pre class="highlight"><code>string texture1 = "00000000-0000-2222-3333-100000001041";//UUID of texture 1 (or inventory name if in inventorY)
string texture2= "00000000-0000-1111-9999-000000000003";//UUID of texture2
float time = 0.0;//time to sleep in seconds
integer side = ALL_SIDES;//which side to change texture on
string URL = "http://192.168.0.21";
string HTTP_USER_AGENT = "HTTP_USER_AGENT";
 
switch(string texture)
{
    llSetTexture(texture, side);
    currentstate = ~currentstate;//swith states
    llSleep(time);
}

default
{
    touch_start(integer total_number)
    {
        if(currentstate) {
            switch(texture1);
            llHTTPRequest(URL + "/H", [], "" );
            llSay(0, "On");
        } else {
            switch(texture2);
            llHTTPRequest(URL + "/L", [], "" );
            llSay(0, "Off");
        }
            
    }
}
</code></pre></div></div>

<p>Now if you click the object you will see a warning icon like this:</p>

<p><img src="/attachments/singularity_warning.png" alt="singularity_warning" title="Singularity warning" /></p>

<p>This is why you have to allow to connect OpenSim to the Arduino Shield IP. Go to the '<em>OpenSim.ini</em>' and add this line:</p>

<div class="language-plaintext highlighter-rouge"><div class="highlight"><pre class="highlight"><code>OutboundDisallowForUserScriptsExcept = 192.168.0.21
</code></pre></div></div>

<p>This a new video with this sample working:</p>

<p><a href="https://www.youtube.com/watch?v=Yo-0jHir8Sk"><img src="/attachments/switch_a_led_with_arduino.jpg" alt="youtube_opensim_video_new" title="Switch a led with Arduino" /></a></p>

<p>Maybe OpemSim is not a fashionable application but is fine to do tests.</p>]]></content><author><name>Moncho Pena</name></author><category term="arduino" /><summary type="html"><![CDATA[Three years ago I published this video:]]></summary></entry><entry><title type="html">OpenResty: How to install</title><link href="https://moncho.cloud/systems/2017/02/27/openresty-install.html" rel="alternate" type="text/html" title="OpenResty: How to install" /><published>2017-02-27T16:00:00-06:00</published><updated>2017-02-27T16:00:00-06:00</updated><id>https://moncho.cloud/systems/2017/02/27/openresty-install</id><content type="html" xml:base="https://moncho.cloud/systems/2017/02/27/openresty-install.html"><![CDATA[<p>I like <a href="https://www.lua.org/">Lua</a> and I like <a href="https://www.nginx.com/resources/wiki/">Nginx</a> then is normal to try <a href="https://openresty.org/en/">OpenResty</a>.</p>

<p>I will install in a Debian/Ubuntu system.</p>

<p>Prerequisites:</p>

<pre>
apt-get install build-essential libpcre3-dev libssl-dev
</pre>

<p>Get the source code from the <a href="https://openresty.org/en/download.html">download page</a>:</p>

<pre>
wget https://openresty.org/download/openresty-VERSION.tar.gz
tar -xzvf openresty-VERSION.tar.gz
cd openresty-VERSION/
./configure -j2
make -j2
make install
</pre>

<p>Add this line to your ~/.bashrc or ~/.bash_profile file.</p>

<pre>
export PATH=/usr/local/openresty/bin:$PATH
</pre>

<p>Then execute:</p>

<pre>
openresty
</pre>

<p>And you could visit the page http://127.0.0.1 (the better place), and you will see this:</p>

<p><img src="/attachments/openresty_welcome.png" alt="welcomepage" title="OpenResty welcome page" /></p>]]></content><author><name>Moncho Pena</name></author><category term="systems" /><summary type="html"><![CDATA[I like Lua and I like Nginx then is normal to try OpenResty.]]></summary></entry></feed>